Let The Games Begin...
Flash is both a drawing tool and a movie editor. If you've used other graphics applications, some of the tools may look familiar, but some won't. To keep things simple, let's start with a little introduction to the interface before diving right in to the nuts and bolts.
The drawing tools in Flash let you create and modify shapes for the artwork in your movies. For an interactive introduction to drawing in Flash, choose Help > Lessons > Drawing in your Flash program. The tools for painting are kept in the "Tools" bar, usually positioned at the left top of your Flash Screen.
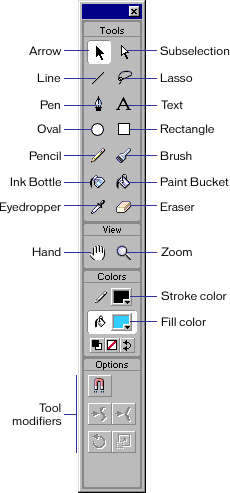
This is the main area where you will find all your image editing tools.
On the following pages we will guide you through the use of each of these tools, starting with the simplest.
But before going through the different tools, we will look at the way Flash handle drawings. The most important thing to understand is the distinction between outlines and fills. When you draw a line there is no fill - only the outline. When you draw a rectangle (or a circle) you actually draw two things: The outline (border) and the fill. Unlike most other programs, Flash doesn't automatically combine these two into one object.
Pencil Tool:
SHIFT key : Constrain directions You can press the Shift key while dragging to constrain lines to vertical or horizontal directions.
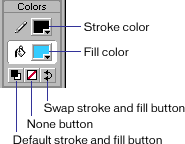
Colors
You can specify the color with the Stroke Color Tool.
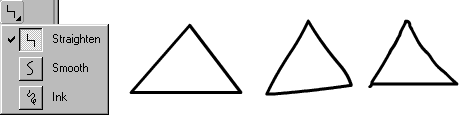
Smoothing and Straightening
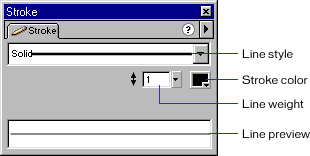
Stroke panel : Window > Panels > Stroke
Finally, you can specify line style (solid, dotted etc.), line width in pixels and color using the Stroke panel.
Line Tool:
SHIFT key : Constrain angles
You can press the Shift key while dragging to constrain possible angles for the line. By default this will only allow for lines that are either horizontal, vertical or 45 degrees between.
Colors
You can specify the color with the Stroke Color Tool.
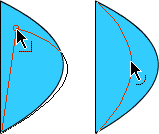
Curving You can turn a straight line into a curve with the Arrow tool 
- Make sure the line is not selected (you can do this by clicking somewhere on an empty spot on the stage).
- Select the Arrow tool.
- Click on the line, and while holding down the mouse button, drag the curve.
- Release the mouse button and your curve is finished
Curving Lines and Edges:
Moving
You can move a line with the mouse, quite similar to how you'd turn it into a curve or you can move it with the arrow keys.
- Select the Arrow tool.
- Make sure the line is selected (you can do this by clicking once on the line then release the mouse button).
- Click on the line, and while holding down the mouse button, move it to the new position.
- Press the arrow keys on your keyboard to move the line.
Precise Size and Positioning
You can position the line perfectly by using the info panel.
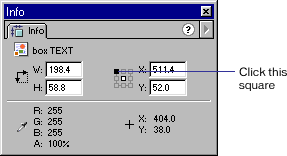
The "square" connected to the line where it says "Click this square" is used to set the origin for coordinates - either at top left or center of the stage.
Fields for X and Y are used to enter the position of the selected object.
Fields for W and H are used to enter the width and height of the selected object.
When working with lines, one might think that height would be 1 for a thin line.
However, width and height refers to the square between the start and end points of the selected object.
A horizontal line that is 100 pixels wide and 1 pixel high spans a square of 100 x 1 pixels. A similar line would span a square of 100 x 100 pixels if it was turned 45 degrees.
Oval Tool
SHIFT key : Round Circles
You can press the Shift key while dragging to ensure your circle is perfectly round.
Colors
You can specify the colors with the Stroke and Fill Color Tools.
Ctrl+G : Grouping Outline with Fill
When you draw a circle, Flash actually creates two objects: the fill and the outline. This may cause problems if you try to move your circle to a new position, because if you fail to select both objects, only the one selected will be moved. To avoid this it's often a good idea to "group" the outline with the fill, thus locking them together as if it was a single object
- Make sure both the fill and the outline is selected. (You can do this in two ways:a. Select the Arrow tool in the toolbox, and while holding down the SHIFT key click on both the fill and the outline.
b. Select the Arrow tool in the toolbox, and drag a rectangle outside your circle) - Press Ctrl+G to group the selected objects. (If at a later point you want to "break" apart the grouped objects, you can do it by selecting the grouped object then pressing Ctrl+B).
Precise Size and Positioning
You can position the oval perfectly using the info panel.
Info Panel : Window > Panels > Info
The "square" connected to the line where it says "Click this square" is used to set the origin for coordinates - either at top left or center of the stage.
Fields for X and Y are used to enter the position of the selected object. Fields for W and H are used to enter the width and height of the selected object.
Rectangle Tool
SHIFT key : Proportioned Squares
You can press the Shift key while dragging to constrain proportions for the rectangle, to ensure your rectangle is a perfect square.
Colors
You can specify the colors with the Stroke and Fill Color Tools.
Rounded Corners
You can specify the rounding of the corners with the "Round Rectangle Options" at the bottom of the toolbox.
Ctrl+G : Grouping Outline with Fill
When you draw a rectangle, Flash actually creates two objects: the fill and the outline. This may cause problems if you want to move your rectangle to a new position, because if you fail to select both objects, only the one selected will be moved.
To avoid this it's often a good idea to "group" the outline with the fill, thus locking them together as if they were a single object.
- Make sure both the fill and the outline are selected. (You can do this in two ways:a. Select the Arrow tool in the toolbox, and while holding down the SHIFT key click on both the fill and the outline.
b. Select the Arrow tool in the toolbox, and drag a rectangle outside your rectangle) - Press Ctrl+G to group the selected objects. (If at a later point you want to "break" apart the grouped objects, you can do it by selecting the grouped object then pressing Ctrl+B).
Skewing
Before skewing a rectangle make sure it has been grouped. You can skew the rectangle in two ways.
To skew an object by dragging:
- Select the object with the Arrow tool.
- Click the Rotate button in the toolbox options.
- Drag one of the centered handles.
To skew an object using the Transform panel:
- Select the object.
- Choose Window > Panels> Transform.
- Click Skew.
- Enter angles for the horizontal and vertical values
Precise size and positioning
You can position the Rectangle perfectly using the info panel. Info Panel :
Window > Panels > Info
The "square" connected to the line where it says "Click this square" is used to set the origin for coordinates either at top left or center of the stage.
Fields for X and Y are used to enter the position of the selected object.
Fields for W and H are used to enter the width and height of the selected object.
Fields for W and H are used to enter the width and height of the selected object.
Eraser Tool:
Double-click Eraser Tool:
Erase All You can double click the Eraser tool to delete everything on the stage. (If you happen to do this by mistake you can always click Ctrl+Z to undo).
Using the Eraser Mode Option
- Erase Normal - erases strokes and fills on the same layer.
- Erase Fills - erases only fills; strokes are not affected.
- Erase Lines - erases only strokes; fills are not affected.
- Erase Selected Fills - erases only the currently selected fills and does not affect strokes, selected or not. (Select the fills you want to erase before using the Eraser tool in this mode.)
- Erase Inside - erases only the fill on which you begin the eraser stroke. If you begin erasing from an empty point, nothing will be erased. Strokes are unaffected by the eraser in this mode.
Using the Faucet Option
- Select the Eraser tool and then click the Faucet modifier.
- Click the stroke segment or filled area that you want to delete.
Using the Eraser Shape Option
Alternative ways to delete things
There are other ways to delete things besides using the Eraser tool. The most common way is to select one or more objects and then press the DEL key on the keyboard. You can delete an entire layer by clicking the layer at the top of your screen and dragging it to the Trash bin. You can delete several frames at once by selecting the frames (and layers) in the timeline, then right click and choose "cut frames".
Ink Bottle Tool:
Using the Ink Bottle tool, rather than selecting individual lines and objects, makes it easier to change the stroke attributes of multiple objects at one time.
To use the Ink Bottle tool:
- Select the Ink Bottle tool.
- Choose a stroke color as described in Using the Stroke and Fill controls in the toolbox.
Color Tools:
3. Choose line style and line width from the Stroke panel.
Stroke Panel:
Window > Panels > Stroke
4. Click an object on the Stage to apply the stroke modifications.
Applying outlines to existing objects:
You can use the stroke tool to apply outlines even for things that were initially made without outlines.
For example, if you initially created a rectangle with no outline, then later decided you wanted an outline, simply use the Ink Bottle tool as described above and a new outline will be applied.
For example, if you initially created a rectangle with no outline, then later decided you wanted an outline, simply use the Ink Bottle tool as described above and a new outline will be applied.
Paint Bucket Tool
You can also use the Paint Bucket tool to adjust the size, direction, and center of gradient and bitmap fills.
To use the Paint Bucket tool to fill an area:
- Select the Paint Bucket tool.
- Choose a fill color from the color tool box.
Color Tools:
3. Click the Gap Size modifier and choose a gap size option:
3. Click the Gap Size modifier
- Don't Close Gaps : if you want to close gaps manually before filling the shape. Closing gaps manually can be faster for complex drawings.
- Choose one of the Close options to have Flash fill a shape that has gaps.
4. Click the shape or enclosed area that you want to fill.
To adjust a gradient or bitmap fill with the Paint Bucket tool:
1. Select the Paint Bucket tool.
2. Click the Transform Fill .
.
3. Click an area filled with a gradient or bitmap fill.
Depending on the type of object you're painting you will see different handles:
a. Transform Linear Gradient Fills
 .
.
b. Transform Radial Gradient Fills
 .
.
c. Transform Bitmap Fills
 .
.
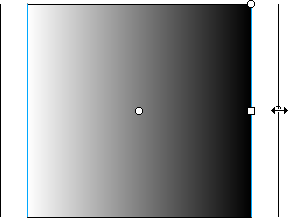
4. Reshape the fill in any of the following ways:
a. To reposition the center point, drag the center point.

b. To change the width of the fill, drag the square handle on the side of the bounding box. (This option resizes only the fill, not the object containing the fill.)
c. To change the height of the fill, drag the square handle at the bottom of the bounding box.
d. To rotate the fill, drag the circular rotation handle at the corner. You can also drag the lowest handle on the bounding circle of a circular gradient or fill.

e. To scale a linear gradient, drag the square handle at the center of the bounding box.
f. To change the radius of a circular gradient, drag the middle circular handle on the bounding circle.
g. To skew or slant a fill within a shape, drag one of the circular handles on the top or right side of the bounding box.
h. To tile (repeat) a bitmap inside a shape, scale the fill.

Note: To see all of the handles when working with large fills or fills close to the edge of the Stage, choose View > Work Area.
2. Click the Transform Fill
3. Click an area filled with a gradient or bitmap fill.
Depending on the type of object you're painting you will see different handles:
a. Transform Linear Gradient Fills
.b. Transform Radial Gradient Fills
.c. Transform Bitmap Fills
.4. Reshape the fill in any of the following ways:
a. To reposition the center point, drag the center point.
b. To change the width of the fill, drag the square handle on the side of the bounding box. (This option resizes only the fill, not the object containing the fill.)
c. To change the height of the fill, drag the square handle at the bottom of the bounding box.
d. To rotate the fill, drag the circular rotation handle at the corner. You can also drag the lowest handle on the bounding circle of a circular gradient or fill.
e. To scale a linear gradient, drag the square handle at the center of the bounding box.
f. To change the radius of a circular gradient, drag the middle circular handle on the bounding circle.
g. To skew or slant a fill within a shape, drag one of the circular handles on the top or right side of the bounding box.
h. To tile (repeat) a bitmap inside a shape, scale the fill.
Note: To see all of the handles when working with large fills or fills close to the edge of the Stage, choose View > Work Area.
Eye Dropper Tool
To use the Eyedropper tool:
1. Select the Eye Dropper tool and click the object whose attributes you want to copy. (When you click a stroke, the tool automatically changes to the Ink Bottle tool. When you click a filled area, the tool automatically changes to the Paint Bucket tool)
2. Click the object that you want to apply the new attributes to.
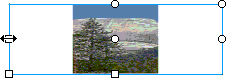
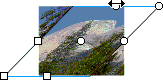
Using the Eyedropper tool to select a bitmap fill:
Rather than painting with a fixed color or gradient you can paint using a bitmap image. A very important special use of the eyedropper tool is to select bitmap fills.
1. Place a bitmap image on the stage. Either drag it from your symbol library (Ctrl+L or Window > Library) or import a bitmap image from a file (Ctrl+R or File > Import).
2. Make sure the imported bitmap is selected. (If not: click on it with the Arrow tool).
3. Press Ctrl+B to break apart the image.
4. Select the Eye Dropper tool and click on the image.
You will now see a miniature of your image in the Color Fill tool box. Use the Paint Bucket tool to apply the bitmap fill to an object. (Note: you can apply the fill to any filled object as well as any closed outlined area.)
Pen Tool:
The purpose of the Pen tool is to allow you to draw precise paths as straight lines or smooth, flowing curves.
You can create straight or curved line segments and adjust the angle and length of straight segments and the slope of curved segments afterwards.
There are two methods for drawing with the Pen tool:
1. Click to create points on straight line segments
2. Click and drag to create points on curved line segments.
Each method is described below.
To draw straight lines with the Pen tool:
1. Select the Pen tool.
2. Click on the stage to set points, and watch how Flash automatically connects points as you set them.
3. To complete the path leaving it as either an open or closed shape. Do one of the following:
3a. To complete an open path, double click the last point or click the Pen tool in the toolbox, or Control-click (Windows) or Command-click (Macintosh) anywhere away from the path.
3b. To close a path, position the Pen tool over the first anchor point. A small circle appears next to the pen tip when it is positioned correctly. Click to close the path, and watch how Flash automatic adds a fill once the path becomes a closed outline.
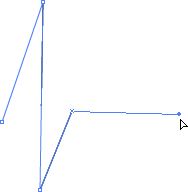
To draw curves with the Pen tool:
First look at this 4 step example:
An example of curve drawing with the pen tool
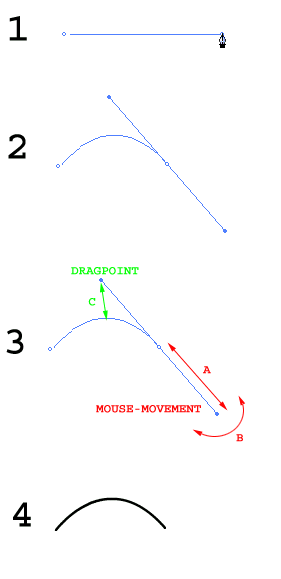
1. Select the pen tool and click twice to create a straight line - on the second click keep the mouse button down.
2. Drag the mouse towards yourself - which will cause the control line to appear. The control line is pulled in the one end and has a drag point in the other end.
3. Move the mouse from side to side (B) and forward and down (A)- still holding down the button, and see how the drag point moves accordingly.
The drag point defines both how much and in which direction the initial straight line is dragged.
4. When the curve on the initial straight line is shaped the way you want it release the mouse button, and the end result appears while the control line disappears.
No comments:
Post a Comment