Photoshop Interface Tutorial: The Menu Bar
Home of the File, Edit, Image, Layer, Select, Filter, View, Window, and Help Menus
In this Photoshop tutorial, we'll do a quick overview of the Menu Bar, part of the Photoshop Interface.

Photoshop's Menu Bar (Windows version).
If you've been using a computer for any length of time, you're undoubtedly familiar with the concept of a menu bar, usually located at the top of the screen. With most programs, it's where you'll find the standard options to open, close, save, and print files, as well as various other options and commands specific to that program.
Photoshop is no different. You'll find the Photoshop menu bar in its usual place up in the top left corner of the screen, and it's where you can open, close and save your Photoshop documents, change your Photoshop preferences and keyboard shortcuts, crop and resize your photos, and view Photoshop's Help file. But those are just the most basic options. Photoshop's menu bar allows you to do so much more.
As you can probably imagine, a program like Photoshop has more options than you can wave a Magic Wand tool at, so to try and keep things simple and well organized, Adobe has divided the options into categories. The words you see in the menu bar (File, Edit, Image, Layer, Select, Filter, View, Window, and Help) are not options themselves but rather the main category names. There's 9 main options categories in total, and clicking on a category name will open a drop-down box displaying all the various options that Adobe has placed in those categories. Starting from the left, we have:
In this Photoshop tutorial, we'll look at the File Menu, part of Photoshop's Menu Bar located at the top of the screen.
 | Photoshop's File menu is where you find many of the standard options you'd expect in the program, such as opening, closing and saving documents. A quick glance at the screenshot on the left though shows that there's quite a few more options than just those. Just as Photoshop's many options and commands have been categorized into 9 main menu categories in the Menu Bar to keep things simple, the options under each main category have also been grouped together into sub categories to make things easier. If you look closely, you'll see that under the "Open Recent" option is a horizontal line. There's another horizontal line under "Edit in ImageReady", and additional lines as you go further down the list. It may appear at first that these lines are there to underline or highlight certain options, but what they're really there for is to keep similar options grouped together. Creating/Opening A DocumentThe first group, consisting of "New", "Open", "Browse", "Open As", and "Open Recent", is our "Let's open a document!" section. These options give us the ability to create a new Photoshop document, or open an existing document. You're not limited to opening just Photoshop documents though. Any number of file formats can be opened in the program, including jpegs, gifs, png files, tiffs, eps files, and the list goes on and on. You can even open Pixar files in Photoshop, for those of you who, you know, work at Pixar ("Toy Story", "Finding Nemo", etc.). The only odd duck in the list is "Browse" which doesn't create or open a document at all. Instead, it opens up the Adobe Bridge (in Photoshop CS2) which allows us to browse and navigate through all of our existing documents. The Bridge replaces the File Browser from previous versions of Photoshop and is now a completely separate program. You don't need Photoshop open to access the Bridge, although you certainly can access it from within Photoshop, as well as any of Adobe's other programs like Illustrator and InDesign. |
Edit In ImageReady
The second group isn't really a group at all since it contains only one lonely option, "Edit in ImageReady". ImageReady is a companion program to Photoshop (it installs with Photoshop) and is used mainly to create graphics for websites. Clicking the "Edit in ImageReady" option will open ImageReady (if it isn't open already) and transfer your document over to ImageReady so you can do all sorts of web-related stuff which we won't cover here since ImageReady is a huge program in its own right and would require a completely separate website to cover it.
Closing/Saving A Document
If the first group was our "Let's open a document! section, this third group under the File Menu is our "Let's close our document!" section. Again, not overly exciting but it definitely has some useful options for us. The first option, "Close", will close only the document you currently have active. If you're only working on one document, it will close that document. If you have multiple documents open at once, selecting "Close" will close only the document you currently have active. To close every document you have open at once, select "Close All".
"Close and Go To Bridge" will, as the name implies, close your document and then open up Adobe Bridge where you can select the next file you wish to work on. Again, Adobe Bridge is only available if you're using Photoshop CS2, otherwise you'll see the File Browser in place of the Bridge.
The next four options in this section are for saving our document. If you're working on a previously existing document or you've created a new document and have already saved it at least once, choosing "Save" will save it again in its current state, overwriting the previously saved version.
If you've created a new document and have not saved it yet, choosing "Save" will automatically bring up the "Save As" option instead, which will allow you to choose where on your computer you'd like to save the document, and in which format. (It doesn't have to be saved as a Photoshop document. Other formats such as jpeg, gif, png, eps, tiff, and lots more can also be selected).
The next option, "Save A Version", is a more advanced option which we won't cover because it requires that you have Version Cue installed, which is only available as part of the full Adobe Creative Suite package.
"Save For Web" brings up a dialog box which allows you to save and optimize your document for use on a website. You may be wondering why Photoshop has a "Save For Web" feature when ImageReady, not Photoshop, is what handles all of Photoshop's web-related options and functions. The simple answer is that while you may never have a need for any of ImageReady's more advanced web-related tools (unless you happen to be a web designer), it is quite common to want to save a copy of a photo for uploading to a website or for emailing to someone after working on it in Photoshop, so Adobe included the "Save For Web" option right in Photoshop so we wouldn't have to keep jumping over to ImageReady just to do that one thing. It's interesting to note though that Photoshop's "Save For Web" dialog box is actually powered by ImageReady, so you are technically working inside ImageReady when saving a file for the web in Photoshop, even though ImageReady is nowhere to be seen. Strange, but true.
The final option in this group, "Revert", will revert your document back to the state it was in the last time you saved it. So if, for example, you open an existing document in Photoshop, make a bunch of changes to it, then decide you're not happy with anything you've done and you want to revert back to the way the file was when you opened it, choosing Revert will do exactly that.
Placing A File
The fourth group under the File Menu is for placing an existing file inside an open Photoshop document. Rather than opening two separate documents and then dragging one inside the other, Place allows us to essentially open one document directly inside another document.
With a document already open inside Photoshop, choosing the "Place" option brings up a dialog box allowing you to locate the file on your hard drive that you want to place inside your document. The file will then be inserted into your document on its own layer. In Photoshop CS2, when you place a file inside an open document, the file is placed as a Smart Object, which is a powerful new addition to Photoshop CS2. We'll cover Smart Objects in a future section.
Importing/Exporting A File
The fifth group under the File Menu is for importing and exporting files. Most of what's in this group qualifies as advanced topics which we're not going to cover here. One exception though is the Import option which allows you to import an image into Photoshop directly from your scanner. If you have a scanner hooked up to your computer and you have the drivers and other necessary software for it installed, your scanner will appear in Photoshop's Import options (you'll have to close and then open Photoshop again to see your scanner listed if you installed your scanner while Photoshop was already open). Of course, every scanner comes with different software with different options, so you'll have to consult your scanner's manual for instructions on how to use it.
Automation And Scripts
The Automate and Scripts group under the File Menu is where Photoshop can do all sorts of cool things for us while essentially on automatic pilot. You can have Photoshop create PDF presentations, or Web Photo Galleries, or Picture Packages and Contact Sheets which are great if you're a photographer. You can also create panoramic photos out of individual photos using the Photomerge option.
File Info
The File Info option, grouped all by itself, does precisely what it's name implies. It brings up a rather large dialog box where you can view, add and edit information about the document you're working on, such as the Document Title, Author, Description, Copyright Information, and much, much (much!) more.
Printing A Document
The next group under File Menu contains all of Photoshop's options for printing a document.
Jumping To Another Program
The next group is another one that contains only one option, the "Jump To" option. This option, which is also found in ImageReady and is quite honestly one you may never use, allows you to jump to another graphics or html editing program which you have installed on your computer. Since these other programs have nothing to do with Photoshop, we're obviously not going to cover them here.
Exiting Photoshop
And finally, way down at the bottom of the list is our last group, again with only one option, "Exit". Fairly self-explanatory. Choosing "Exit" will close Photoshop completely. If you have documents open when you choose "Exit" and you've made changes to these documents since the last time you saved them, Photoshop will ask you if you want to save the documents first before closing the program. You can choose to save or not save the document(s), or you can choose "Cancel" when asked to save the document and that will cancel Photoshop's shut down process and keep the program open and running.
Undo/Redo, Cut, Copy, Paste, Preferences, Keyboard Shortcuts, And More
In this Photoshop tutorial, we'll look at the Edit Menu, part of Photoshop's Menu Bar located at the top of the screen.
 | Like Photoshop's File Menu, the Edit Menu is where you'll find a lot of things you'd expect to find in an Edit Menu, like Cut, Copy and Paste, Undo and Redo, a Spell Checker, a Find and Replace text option, and also like the File Menu, a whole bunch of options that are specific to Photoshop. Let's take a brief look at each of the Edit Menu's various sections, which are grouped together by the horizontal lines you see throughout the list. Undo and RedoThe first group under the Edit Menu is our Undo and Redo section. If you make a mistake while working on a document and want to undo the change you made, simply choose Undo from the Edit Menu and your document reverts back to the step before you made the change. If you then change your mind and decide you didn't want to undo that last step after all, simply go back to the Edit Menu and you'll notice that the word "Undo" has changed to "Redo", allowing you to redo the step. While Undo and Redo are great features to have, they're extremely limited in the sense that they can only undo and redo the last change you made. There is no way to do multiple undo or redo's in Photoshop. Or is there? Why of course there is. Photoshop wouldn't be the world's best image editing program if you were stuck with one lousy undo and redo. That's where the next two options, "Step Forward" and "Step Backward" come in. Depending on how much memory you have in your computer and how many History states you've set up in Photoshop's preferences, you can step forward and backward through all your changes to your heart's content (or at least until you've run out of History steps or system memory, or both). |
Fade
The second group under the Edit Menu has one solitary option it in, with the highly descriptive title of "Fade". What the "Fade" command does is allow you to make changes to the last filter or effect you applied to your image. It pops open a dialog box which allows you to change both the opacity of the filter or effect and the blend mode. There's one very strict condition with this option though - it only works as long as you haven't done anything else first after applying the filter or effect. As soon as you do something else, the "Fade" option becomes grayed out and is no longer available, so if you want to use the "Fade" option, choosing it must be the very next thing you do after applying to filter or effect.
Cut, Copy, Paste
The third group of options under the Edit Menu is where we find the standard "Cut", "Copy", and "Paste" commands which you're undoubtedly familiar with. One option you may not be familiar with is "Copy Merged", which is used when you have a document containing multiple layers and you want to make a copy of all the layers but have them merged into one layer above all the original layers, which is very useful to do when retouching or restoring a photo.
Another option you may not be familiar with is "Paste Into". "Paste Into" allows you to cut or copy a selection of an image and then paste it into another selection in the same image, or in a selection in a different image. It sounds a lot more confusing than it is, and it's used mainly for creative effects.
The final option in this section, "Clear", is basically just another word for "Delete" in that it will delete anything inside of a selection.
Spell Checker & Find And Replace
Photoshop may be at heart a pixel-pushing image editing application, but Photoshop's text and type abilities continue to improve with each new version. Since Photoshop 7, Adobe has been including both a Spell Checker and a Find and Replace command with Photoshop, and this fourth group under the Edit Menu is where we find them.
Fill & Stroke
The fifth options group under the Edit Menu is where we find the options to fill and/or stroke a selection. If you're familiar with other graphics programs like Adobe Illustrator, you'll be familiar with the terms. "Fill" refers to the area inside of a selection, which we can "fill" with a solid color or a pattern. "Stroke" refers to the outline of the selection, which we can color independently of the fill color.
Defining Patterns, Brushes and Custom Shapes
The sixth group under Edit is where we can define new patterns, brushes and custom shapes to use in our documents.
Purging Photoshop
The Purge command under the Edit Menu is located all by itself in its own group, and it allows us to free up system memory that's being used by the Undo command, the Clipboard, the History palette, or all three at once. This is useful if your computer has limited resources available and you're finding that the size of your document is causing Photoshop to perform poorly. Keep in mind though that once you've purged the information from your system's memory, it's gone forever, so it's a good idea to invest in as much memory for your system as you can afford. No amount of memory is enough for Photoshop, but still, the more you have, the better your chances of avoiding any noticeable performance issues.
Adobe PDF Presents and the Preset Manager
The File Info option, grouped all by itself, does precisely what it's name implies. It brings up a rather large dialog box where you can view, add and edit information about the document, such as the Document Title, Author, Description, Copyright Information, and much, much more.
Color Settings & Profiles
The second last group under the Edit Menu deserved an entire website unto itself and has to do with Photoshop's color settings and profiles.
Keyboard Shortcuts, Menus & Preferences
Finally, way down at the bottom of the Edit Menu is where we can change the default keyboard shortcuts that Photoshop comes with. We can even make our own shortcuts that didn't exist by default. How cool is that?
Photoshop Interface Tutorial: The Image Menu
Image Size, Canvas Size, Image Adjustments, Color Modes, And More
In this Photoshop tutorial, we'll look at the Image Menu, part of Photoshop's Menu Bar.
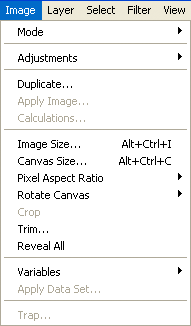 | Photoshop's Image category in the Menu Bar is where you'll find options that have to do with things like the ever-popular cropping and resizing images, changing the canvas size, rotating the image, and changing the image's color mode. Let's take a closer look at the different sections under the Image Menu. Image ModeThe first option under the Image Menu, "Mode", is in a group all by itself and is where you can change the image's color mode and bit depth. Available color modes include Bitmap, Grayscale, Index, RGB, CYMK, and Lab (pronounced "L-a-b", not "Lab). Bit depth, which has to do with how many colors are available in your image, can also be set here, with the choices being either 8-bit, 16-bit, or 32-bit. |
Image Adjustments
The second group under the Image Menu is where you'll find Photoshop's options and commands to fix up an image's tonal and color problems. The Levels and Curves commands, which are the main tone and color correction tools, are found here, along with plenty of other options to make their images look their best.
Duplicate, Apply Image and Calculations
The third group under the Image Menu contains one really simple option and two not-so-simple ones. The first one, "Duplicate", simply allows you to create a duplicate copy of your Photoshop document; useful if, for example, you want to try a different approach to color correcting your image and then compare the results of the two approaches side by side.
"Apply Image" and "Calculations" are two advanced topics which we won't get into for now.
Image Size, Canvas Size, and Resolution
The fourth group under the Image Menu is both simple and often times the most confusing part of Photoshop. The simple part is that here is where you can resize, crop, and rotate your images. The part a lot of people find confusing is that changing the image size brings up the topic of image resolution, which has to do with how many pixels you have in your image left-to-right and top-to-bottom, and how many of those pixels will print per inch when you go to print your image. We'll take a closer look at image resolution in another section.
Variable and Data Sets
This fifth group under Image has to do with creating data-driven graphics using variables and data sets, which will be familiar to you if you have any sort of programming background and completely unfamiliar to you if you don't. Variables and data sets have been around in ImageReady for several versions now, but they're brand new to Photoshop CS2.
Trap
The final group under the Image Menu contains the "Trap" option. Trapping is a printing term which has to do with preventing small gaps in your image when having it printed due to a slight misregistration on the printing press. It's not something you normally have to worry about unless you're having your images professionally printed at a print shop, in which case you'll need to ask someone there what trap value to enter in the dialog box, if anything.
Photoshop Interface Tutorial: The Layer Menu
Create/Delete Layers, Layer Styles, Adjustment Layers, Layer Masks, Smart Objects, and More
In this Photoshop tutorial, we'll look at the Layer Menu, part of Photoshop's Menu Bar.
 | Photoshop's Layer Menu in the Menu Bar is where you'll find options that have to do with, you guessed it, layers. From here, you can do things like create, duplicate and delete layers, add layer effects and layer masks, rasterize layers (a fancy term for turning the contents of a layer into pixels if they're not pixels already), move them up and down in the stacking order, and even flatten them all into one layer. Plus a whole lot more. Once you become more familiar with Photoshop, you'll probably find that you spend less and less time in the Layer Menu and more time either selecting the same options from the Layer Palette itself, or even better, by simply using the keyboard shortcuts associated with many of the options and commands. And don't forget, you can create your own custom keyboard shortcuts as well. Let's take a closer look at the various groupings inside the Layer Menu. New/Duplicate/DeleteThis first group of options in the Layer Menu is fairly straightforward. Here's where you can create new layers, duplicate existing layers, and/or delete existing layers. You can also create new layer groups, which are a great way to organize your layers into manageable sections, and if you have a bunch of layers you've hidden from view and you're absolutely positive you have no use for them anymore, you can delete all your hidden layers at once from here. Properties and StylesThe second group in the Layer Menu is where you can change the layer properties and add layer styles. Properties are essentially just two options, the layer's name and, if you choose, a color to associate with that layer. Associating a color with a layer is simply another way to manage and organize your layers and has nothing to do with adding color to your image. Layer styles though are a whole lot more interesting than properties. "Styles" is what Adobe calls effects, and they deserve a whole section on their own. Layer styles can be a lot of fun to try out and play around with even if you don't really know what you're doing, and if you do know what you're doing, even better. Shadow and glow effects, bevel and emboss, gradients, strokes, patterns, colors, and for the truly adventurous, advanced blending modes! Go ahead, give them a try. |
Fill And Adjustment Layers
The third group under the Layer Menu is where we find Photoshop's Fill and Adjustment Layers. There's 3 types of fill layers and 12 types of adjustment layers. Fill layers are used to, well, fill your document with either a solid color, a gradient or a pattern. Adjustment layers, on the other hand, allow you to make things like Levels and Curves adjustments to your image. The great thing about Adjustment Layers though is that none of the adjustments you make with them physically affect your original image. Your original image remains safe at the bottom of the Layers Palette. It still appears in the Document Window as though you're making the changes to the image, but what you're really seeing is a live preview of how the changes would be altering your image if they were, in fact, altering your image, which they're not. We'll look more closely at Adjustment Layers in another section.
One really cool feature here is the "Change Layer Content" option, which allows you to select an adjustment layer in the Layer Palette and change it to any of the other types of adjustment layers. If you have a Levels adjustment layer in your Layer Palette and you decide you need a Curves adjustment layer instead, you can change it from Levels to Curves instantly and easily here. It probably isn't something you'll use very often, but still an interesting feature.
The final option in this group, "Layer Content Options", is one you'll only use if you're being paid by the hour. If you need to alter the settings in one of your adjustment layers, you can select the adjustment layer in the Layers Palette and then select "Layer Content Options" from the Layer Menu to make changes to the adjustment. However, since double-clicking on the adjustment layer in the Layers Palette does the exact same thing, you might as well forget this last option even exists in the Layer Menu.
Masks
The fourth group under the Layer Menu is where we find our masking options. From here, you can add a layer mask, a vector mask, or a clipping mask. Masks allow us to show only parts of a layer while hiding the rest from view without actually deleting the areas we want hidden. Layers, Adjustment Layers and Masks are three of the most important elements of Photoshop and you'll be using them over and over again.
Smart Objects, Type and Rasterize Layer
The next group under the Layer Menu is where we find options for type, such as the amount of anti-aliasing we want on our type, whether we want horizontal or vertical type, an option to convert our type to a shape so we can do all sorts of cool things to it we otherwise couldn't while it was still editable type, and options that allow us to warp the type into different shapes while still keeping the ability to fully edit the text.
We also have the option here to "rasterize" the contents of the layer. In other words, take the type or other vector shape and convert it to actual pixels.
The very first option in the list though, which I've purposely saved for last, is Smart Objects, which is an amazing new feature in Photoshop CS2 that is changing the way things are done inside Photoshop. We won't get into a huge discussion about Smart Objects here, but this is where you can take the contents of your layer and convert them into a smart object.
Layer Based Slices
The sixth group under the Layer Menu has one option in it, "New Layer Based Slice". Slices have to do with optimizing images for the web and involve dividing an image into sections which can be optimized individually and saved in different file formats if needed, and then put back together again as one complete image in a web page. It's sort of like creating a puzzle out of your image in Photoshop (or ImageReady) so you can put the puzzle back together again in your web page (if that makes no sense to you and you're not or have no plans to be a web designer, feel free to forget all about it).
The "New Layer Based Slice" option is simply an easy way to create a sliced section of your image. It will create a slice automatically based on the contents of a layer. So if, for example, you have a rectangular shape on its own layer in your document and, with that layer selected in the Layers Palette, you choose "New Layer Based Slice", Photoshop will create a slice using that rectangular shape as the slice dimensions. Again, this is of interest primarily to web designers.
Grouping and Hiding Layers
The next group under Layer is for grouping/ungrouping and hiding/showing layers. If while working on a Photoshop document you find that you're creating many layers (which is usually the case), it's often times easier to manage those layers if you group similar layers together. For example, if you have a bunch of layers that were used to correct a color problem in an image, you may want to group those layers together into a folder and name the folder "Color corrections". Or you may have multiple type layers which could be grouped into a "Type" folder. Similarly, you can choose to remove any layers from a group at any time.
Hiding and showing layers is basically for turning the visibility of layers on and off. You can also click on the small eyeball icon beside the layers in the Layers Palette to accomplish the same thing, which is much easier than going up to the Layer Menu every time.
Arranging and Aligning Layers
The eighth group under the Layer Menu is for arranging, aligning, and distributing layers.
"Arranging" layers means changing their stacking order in the Layers Palette so you can move layers above or below other layers.
"Aligning" layers allows you to align the top, bottom, left or right edge of the contents of a layer or layers to the edge of the contents of another layer, or to the edge of the document, or to a selection.
"Distribute" layers allows you to spread out the contents of multiple layers equal distance from either other based on their top, bottom, left, or right edges, or their vertical or horizontal centers.
Locking Layers
Continuing our journey down the Layer Menu, we come to another group with only one option, "Lock layers". This option allows us to either lock the layer completely so we can't move it or do anything to it accidentally, or we can lock only certain aspects of the layer, such as only the areas that are transparent, or only the areas that are not transparent, or we can lock the position of the contents of the layer so we can't accidentally move what's on the layer. Or, we can choose to lock it all down at once which leaves us with a layer we can still see but can't make any accidental changes to.
Linking Layers
The third last group in the Layer Menu allows us to link layers together so you can select multiple layers at once. In Photoshop CS2, this option has become irrelevant since we can now select multiple layers simply by clicking on a layer and then holding the Shift key down while clicking on a second layer, which will select both layers plus any layers in between. To select multiple layers that are not stacked directly above or below each other in the Layers Palette, simply hold down the Ctrl key (Win) or the Command key (Mac
) and click on the layers you want to select.
Merging and Flattening
The second last group in the Layer Menu is for merging layers and flattening the image. The difference between the two is that merging layers allows you to choose which layers you want merged into one, while flattening the image will take every layer in the document and merge them into one layer which Photoshop will rename "Background".
When merging layers, you can also choose to merge them onto a new layer while keeping the individual layers intact, whereas flattening the image will always flatten the entire document and leave you with one merged "Background" layer. In most cases, flattening the image is something you'll only do after all the work on an image is complete and you're ready to have the image printed. Even then, since you'll lose all of your individual layers when you flatten the image, you'll want to save your flattened version as a separate document and keep your original document with all its layers intact in case you need or want to make additional changes down the road.
Matting
Finally, the last option under the Layer Menu, grouped all by itself, is "Matting". Matting has to do with the slight fringe or halo effect you sometimes see when making an anti-aliased selection of a person or object in an image and then moving that selection into a new image, or replacing the background in the image with a different background. Sometimes the colors from the original image or background are still visible along the outer edge of the selection. The commands under "Matting" allow you to attempt to remove those unwanted edge pixels, although your mileage may vary as to the effectiveness of these options and there are more advanced ways of correcting the problem.
Photoshop Interface Tutorial: The Select Menu
Select, Deselect, Feather, Transform Selections, Load/Save Selections, and More
In this Photoshop tutorial, we'll look at Photoshop's Select Menu, as part of our look at Photoshop's user interface.
 | Photoshop's Select menu is where you find options related to making selections. The most commonly used options under the Select Menu are "Select All", "Deselect", "Inverse", "Feather", and "Transform Selection", as well as "Load Selection" and "Save Selection". Again, I've colorized the menu to make the various option groupings more obvious. In Photoshop, the groups are divided simply by the horizontal lines. Let's take a look at some of the most useful options in the Select Menu. Selecting and DeselectingThe first group in the Select Menu is straightforward for the most part. "All" allows you to select everything on a layer, "Deselect" removes the selection. "Reselect" will reselect the last selection you made. The only not-so-straightforward option here is "Inverse", which will select everything that outside of your selection and deselect everything that was originally selected. In other words, if you drag out a rectangular selectin in the middle of a layer, Photoshop will select everything within that rectangular selection and leave everything outside of the rectangular shape deselected. By choosing "Inverse", Photoshop will do the exact opposite. It will select everything that was outside of the rectangular selection area and deselect everything that's inside of it. You may be wondering why you'd ever want to do something like that, but it actually comes in very handy more often than you'd think. For example, sometimes it's easier to select everything you don't want selected in an image (perhaps the object you want selected is framed by a solid colored background, in which case selecting the backgound would be easier than selecting the object) and then inverse the selection to select everything you did want to select.. |
Selecting and Deselecting Layers
The second group under the Select Menu may seem very similar to the first group, but they're actually quite different. The first group selects the <em>contents</em> of a layer, while the options in this second group select the layers themselves.
The first option, "All Layers", will as the name implies select every layer in your document. The second option, "Deselect Layers", will deselect any layers you had selected.
The third option though is very handy indeed. "Similar Layers" will automatically select every layer in your document that is of the same type as the layer you currently have selected. If you have a type (as in text) layer selected, "Similar Layers" will select every type layer in your document. Have a shape layer selected? It will select every shape layer in your document. And of course, if you have a layer containing pixels selected, it will select every layer containing pixels. This is extremely handy if, for example, you need to change the font used on every type layer in the document from, say, Arial to Helvetica. Simply select one type layer, then select "Similar Layers" from the Select Menu, switch to your Type tool, change the font up in the options bar to Helvetica, and presto! The font used on every type layer in the document is now Helvetica.
Color Range
The third group under the Select Menu contains just one option, "Color Range". Choosing this option opens up the Color Range dialog box allowing you to make a selection based on the colors in the image.
Feather and Modify
The Select Menu's fourth group contains options for altering our selections after we've made them (these options are grayed out until we make a selection).
The first option, "Feather", allows us to give our selections a soft, "feathered" edge rather than the hard, unnatural edge we normally get with selections. You can set the amount of feathering from 0.2 (virtually no feathering at all) to 250, which is most likely way too much. The amount of feathering you need will depend on the effect you're trying to achieve as well as the resolution of the image. Higher resolution images will require more feathering to achieve the same results than lower resolution images do.
The second option in this group, "Modify", allows you to modify your selection in one of four different ways. You can add a border to your selection, which essentially creates a second selection around your intial selection, leaving everything between the two selections selected. You can then fill the area with a color to create a border effect similar to what you would achieve when stroking a selection. There's also an option here to "Smooth" your selection, which will, depending on the amount of smoothing you enter into the dialog box, smooth out any hard angles in your selection. And finally, you can choose to either "Expand" or "Contract" your selection by the number of pixels you enter into the dialog box.
Grow and Similar
The fifth group under the Select Menu is where we find the "Grow" and "Similar" commands. These commands are similar to the "Expand" command in the group above, with one key difference. While "Expand" simply expands the selection by a specified number of pixels, "Grow" and "Similar" use the tolerance range you've specified in the Magic Wand options to select pixels that are similar in color and tonal value to the pixels in your selection.
"Grow" will include all adjacent pixels that fall within the Magic Wand's tolerance range, while "Similar" will select all pixels that fall within the tolerance range regardless of their location in the image.
You can choose the "Grow" and "Similar" commands over and over again as needed to increase your selection in increments.
Transform Selection
The next group in the Select Menu is "Transform Selection" and is one you'll most likely use a lot. It allows you to move, resize, and distort a selection after you've already made it (and here's the cool part) without affecting anything inside the selection. The selection itself is completely independent of anything that appears to be inside of the selection while you're resizing or reshaping it.
To accept the changes you've made to your selection and to make it an active selection again, simply press Enter (Win) or Return (Mac ).
Load/Save Selection
The final options group under the Select Menu is where we can load and save selections, very useful if you've spent a lot of time working on a complex selection and don't want to lose it or will need to use it again later. Selections are saved as independent channels in the Channels palette and, once saved, are then saved with your document when you close out of it.
No comments:
Post a Comment