Getting Started with Photoshop Article
You’ve heard of Photoshop, right? Of course you have — you wouldn’t be reading this book otherwise! You’ve probably heard of Photoshop’s sidekick, Fireworks, too, but you might not be quite sure of what it does or where it fits in.
Photoshop and Fireworks are two of the most commonly used tools in the web designer’s arsenal. From the preparation of initial design comps to generating optimized graphics for a web page, most web designers rely heavily on these two programs.
In this introductory chapter, which has been adapted from The Photoshop Anthology, 101 Web Design Tips, Tricks and Techniques, I’ll cover some of the basic tools and tasks that we’ll draw on in the later chapters. I’ll also share some of the shortcuts and time-savers that I use frequently. This chapter won’t give you an exhaustive review of the many things that Photoshop can do (where would it end!), but it should provide the bare bones that will help get beginners started. If you’re already familiar with the interface and can perform tasks like making selections, applying gradients, and working with layers, you might want to skip ahead to the next chapter.
So what are you waiting for? Open up Photoshop and let’s go!
THE PHOTOSHOP WORKSPACE
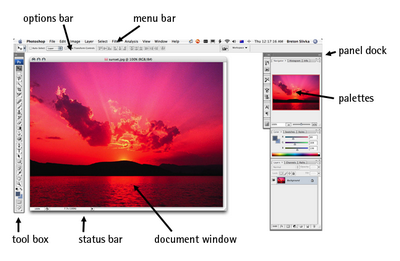
Photoshop’s “out of the box” workspace consists of the following components:
menu bar – You will probably already be familiar with the menu bar from other programs. This runs across the top of your Photoshop window, and contains various menu options for Photoshop’s tools.
options bar – The options bar sits beneath the menu bar and holds contextualized options for different tools. It also contains the workspace menu, where you can save and load arrangements of palettes.
toolbox – By default, the toolbox sits to the left of your Photoshop window, and contains shortcuts to
You’ve heard of Photoshop, right? Of course you have — you wouldn’t be reading this book otherwise! You’ve probably heard of Photoshop’s sidekick, Fireworks, too, but you might not be quite sure of what it does or where it fits in.
Photoshop and Fireworks are two of the most commonly used tools in the web designer’s arsenal. From the preparation of initial design comps to generating optimized graphics for a web page, most web designers rely heavily on these two programs.
In this introductory chapter, which has been adapted from The Photoshop Anthology, 101 Web Design Tips, Tricks and Techniques, I’ll cover some of the basic tools and tasks that we’ll draw on in the later chapters. I’ll also share some of the shortcuts and time-savers that I use frequently. This chapter won’t give you an exhaustive review of the many things that Photoshop can do (where would it end!), but it should provide the bare bones that will help get beginners started. If you’re already familiar with the interface and can perform tasks like making selections, applying gradients, and working with layers, you might want to skip ahead to the next chapter.
So what are you waiting for? Open up Photoshop and let’s go!
THE PHOTOSHOP WORKSPACE
Photoshop’s “out of the box” workspace consists of the following components:
menu bar – You will probably already be familiar with the menu bar from other programs. This runs across the top of your Photoshop window, and contains various menu options for Photoshop’s tools.
options bar – The options bar sits beneath the menu bar and holds contextualized options for different tools. It also contains the workspace menu, where you can save and load arrangements of palettes.
toolbox – By default, the toolbox sits to the left of your Photoshop window, and contains shortcuts to
Photoshop tools.
Comps and Turtlenecks: Designer Lingo
Now that you’re going to be working in Photoshop, you might want to start talking like a designer. Designers, like professionals in most specialist fields, have their own terminology and words for things. A comp (short for “composite”) refers to a mockup of the final solution that a designer has in mind. Traditionally, “comp” is used in the print world to refer to page layouts, but for web designers it usually refers to a static interface prepared entirely in Photoshop for the client to look over before he or she decides to proceed. You might even hear it being used as a verb: “comping” is the process of creating that mockup site.
palettes – Individual “panes” that hold information or options for working with your file, known as palettes (or panels), float on the right-hand side. Each palette is labeled with a tab, and can be minimized, closed, grouped with other palettes, or dragged in and out of a panel dock. In the example that follows, the Navigator palette contains a thumbnail of the image that allows you to zoom in or out of the image quickly, and to change the part of the image displayed on the screen.
document windows – Each open document has its own document window with a status bar along the bottom. The status bar sits to the right of the zoom percentage displayed in the bottom left-hand corner, and displays information that’s specific to the document.
Customizing your Workspace
You can customize your Photoshop workspace to suit you or your project — almost everything within your workspace can be repositioned and reconfigured! You might choose to customize your workspace by:
changing the look of the menu bar
You can change which menu items are visible in your menu bar, and even add color to your menu items. If you wanted, you could also assign new or different keyboard shortcuts to menu commands (which I don’t recommend until you feel very comfortable with Photoshop or have a compelling reason to do so!). Go to Edit > Menus and use the dialog box to modify the menu bar and palette menus.
moving the options bar
If you want to move the options bar, you can do so by clicking on the handle on its left side and moving it around. The options bar will “dock” to the top or bottom of the screen automatically if moved near those areas.
moving the toolbox
The toolbox is extremely portable, and can be moved to any location on your screen. Move the toolbox by clicking on the light gray area at the top of it and dragging it around. You can switch between different toolbox layouts by clicking the double arrow along the top of the toolbox.
rearranging palettes
There are many ways to rearrange your palettes. You might want to separate a palette from its palette group, and move it into another group. You can do this by dragging the palette tab out of its original group and into the new group. You may want to expand or collapse a dock, by clicking on the double arrows at the top of the dock. You might also decide to drag some of your palette tabs out of their dock, and close the rest. To display a palette that has been closed, go to Window and select the palette you want to show.
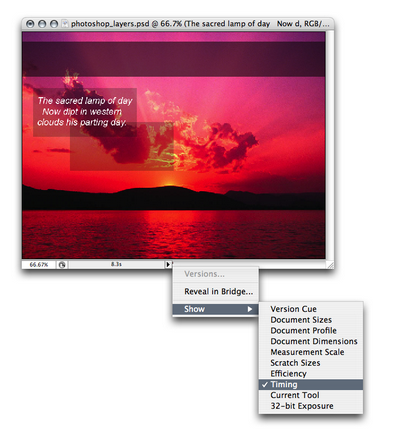
displaying different information in the document window status bar
The status bar displays the document file size by default. The file size is shown as two numbers separated by a forward slash: the first number is an approximation of the image file size with all layers merged (known as “flattening” the image), and the second number is an approximation of the total file size of the image with layers intact. If all this sounds new to you, don’t worry — we’ll be discussing layers shortly. You can set the status bar to display different information, such as the document dimension in pixels, or the version number of the file. To do this, click on the arrow icon next to the status bar, select Show and choose the information you’d like to see.
Saving your Customized Workspace
As you become more proficient with Photoshop, you may discover that you use certain sets of palettes for different types of projects, and that there are some palettes that you don’t use at all. Photoshop allows you to save and load different workspaces — different arrangements of palettes, menus, and even different keyboard shortcuts — to help you work more efficiently.
After you’ve customized your workspace to your satisfaction, select the Workspace menu in the options bar, click Save Workspace and enter a name for your workspace, such as Creating Thumbnails or My Default Workspace. You can then load your different workspaces by opening Workspace and selecting your custom workspace from the menu list.
WORKING IN PHOTOSHOP
Now that you’ve been introduced to the Photoshop workspace and have a basic idea of where everything is, let’s start getting our hands dirty.
Creating New Documents
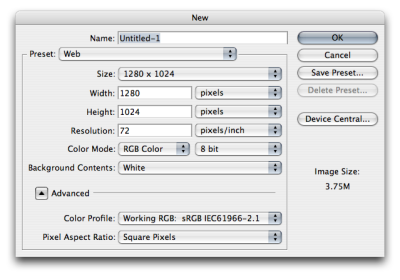
You can create a new document by selecting File > New from the menu bar, or pressing the keyboard shortcut Ctrl-N on a PC or Command-N on a Mac. The New dialog box will appear,where you can specify the document size and other settings.
Opening Files
Open files by selecting File > Open from the menu bar, or pressing Ctrl-O (Command-O on a Mac). You can select and open multiple files by holding down Ctrl (Command on a Mac) and clicking on all the files you require in the file dialog box.
Saving Files
Save a file by selecting File > Save, or pressing Ctrl-S (Command-S on a Mac). For a newly-created document, this will save your work in Photoshop Document (PSD) format. If you would prefer to save a copy of the document, you can use File > Save As or pressing Ctrl-Shift-S (Command-Shift-S on a Mac) instead.
Snappy Presets
If you’re designing for a web site with a minimum screen size of 800×600 pixels, I’d recommend you start with a 750×550 pixel document. The smaller dimensions give you a better estimate of your actual screen area after you take into account scroll bars and menu bars. Also, be sure to set the resolution at 72dpi to reflect the actual screen resolution. If you want easy access to these dimensions for other new documents, it’s probably a good idea to click Save Preset and give the settings a name like Web Page. The next time you create a new document, you will be able to load your Web Page settings from the Preset list.
Saving Files for the Web
Photoshop files themselves can’t be embedded into a web page. You will need to export your file and save it in a web-friendly format. There are three formats for web graphics: GIFs, JPEGs, and PNGs.
GIF
The GIF format (pronounced “jiff” or “giff” depending on which side of the tracks you grew up) can have a maximum of 256 colors. GIF files support transparency and animation, and work best with graphics that have large areas of the same color, as shown in the logo below.
JPEG
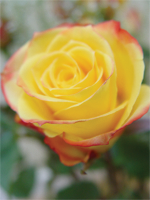
The JPEG format (pronounced “jay-peg”), works best with photographic images or images that have more than 256 colors and gradients, such as the flower on the opposite page. Images saved in JPEG format are compressed, which means that image information will actually be lost, causing the image to degrade in quality.
PNG

The PNG format (pronounced “ping”) is similar to the GIF format in that it supports transparency and works best with solid-color images like the logo shown to the right, but it’s superior to the GIF format as it has the ability to support true levels of transparency for colored areas. Transparent PNGs are currently not in widespread use on the Web because older versions of Microsoft Internet Explorer do not support them; however, they’re often used in Macromedia Flash movies. PNGs can produce a better quality image at a smaller file size than can GIFs. Photoshop allows you to save an image as a PNG-8 file (which works the same way as a GIF would with 256 colors) or a PNG-24 file (which allows for millions of colors as well as variable transparency).
Double-clicking Power
As if keyboard shortcuts weren’t quick enough, Windows users have even more ways to open and save files, such as: holding down Ctrl and double-clicking the work area to create new documents double-clicking the work area to pull up the Open dialog box to open files holding down Alt and double-clicking the work area to open existing files as new documents holding down Ctrl-Shift and double-clicking the work area to save documents holding down Shift and double-clicking the work area to access Adobe Bridge — Adobe’s “control center” and file browser The work area is the gray area behind the document windows. If your shortcuts aren’t working, check that you are clicking on an empty spot on the work area, and not in one of the document windows or Photoshop tools! Alas, Photoshop on a Mac does not have a work area, so Mac users won’t get to enjoy the goodness of double-click shortcuts.
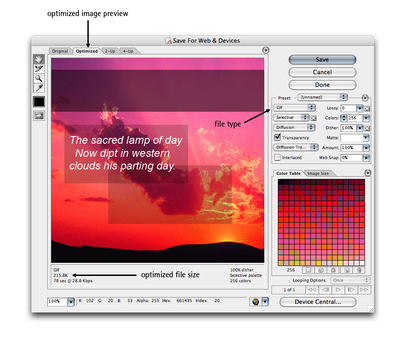
To save for the Web in Photoshop, select File > Save for Web & Devices… or press Ctrl-Alt-Shift-S(Command-Option-Shift-S on a Mac). This will bring up the Save For Web dialog box shown overleaf, which will show you a preview of the image that will be exported, with its optimized size in the bottom left-hand corner. You can adjust the settings for the image using the options in the pane on the right. Choose whether you want to save the file as a GIF,JPEG, PNG-8, or PNG-24, and have a play with the other settings, keeping an eye on the optimized file size. Try to strike a balance between the quality and file size of the image. When you’re happy with your result, click Save and give your image a filename.
If you tried the above exercise, you’re probably quite pleased with yourself for saving an image of reasonable quality at a file size significantly smaller than the original. You managed this by altering the settings in the right-hand pane, but what do these settings actually do?
GIF/PNG-8
colors – Adjusting this setting reduces the number of colors used in the image. This will usually make the biggest difference in the final image.
dither amount and type (No Dither, Diffusion, Pattern, Noise) – This setting has nothing to do with being nervous or agitated (although it’s quite possible that you may have been a few moments ago!). Dither refers to a compression technique in which the pattern of dots is varied to give the illusion of a color gradient. Changing the dither will result in a more noticeable degradation for images that involve a large number of colors blended together.
transparency – If you want transparent areas in your graphic, check this box. We’ll look more closely at transparency in Chapter 2.
matte color – For transparent images, the matte color is used to help blend the edges of your image into the background of the web page. For non-transparent images, the matte color defines the background color of the image. Using matte color with transparent images is covered in more detail in Chapter 2.
JPEG
quality – Changing the value in the Quality drop-down box alters the level of compression for the image. Reducing the quality may result in blurring or pixelation, but too high a setting will produce a large file that will take users too long to download. A good approach is to decrease the quality value gradually until you notice the degradation of your image becoming unacceptable. A reasonable compromise will be somewhere around this point.
Saving Files for the Web in Fireworks
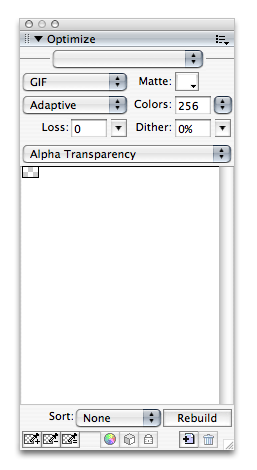
You can optimize images for the Web in Fireworks using the Optimize palette, shown at right. Set the file type and options in the Optimize palette in advance, and when you’re ready to export your web image, select File > Export or press Ctrl-Shift-R (Command-Shift-R on a Mac). Fireworks will save the image based on the settings that you’ve defined.
Why Two Tools?
Considering that it’s possible to save files for the Web in Photoshop, it’s perfectly reasonable for you to wonder why you would need Fireworks. While it’s true that both programs can perform many of the same tasks, there are certain things that Fireworks can do that Photoshop can’t. Fireworks also makes web-specific tasks easier, and since it’s a smaller program that doesn’t contain the full suite of Photoshop effects, it loads more quickly than Photoshop. As you work through this book you’ll come to learn which tool is more suitable for particular tasks.
PHOTOSHOP LAYERS
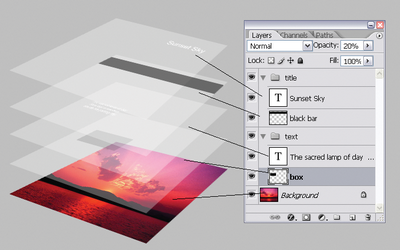
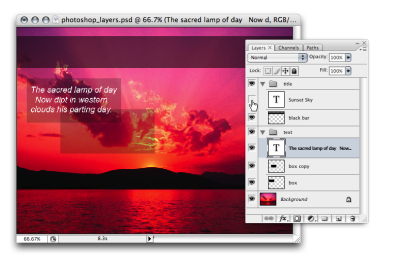
Layers are a powerful feature of Photoshop that allow you to work on one part of an image without disturbing the rest of it. While the concept of layers may seem intimidating at first, once you get the hang of using layers you’ll wonder how you ever survived without them! The examples on the next page show how the layers in the Photoshop document to the right stack together.
The transparent parts of any layer, shown by the checkered grid, allow the layers beneath that layer to show through.
You can show and hide each layer in an image by clicking on its corresponding eye icon in the Layers palette, as shown at the bottom of the following page.
To organize your layers, you can arrange them into layer groups by going to Layer > New > Group…. Each layer group displays in the same way as any ungrouped layers on the Layers palette. A layer group is signified by a folder icon. You can collapse or expand layer groups by clicking on the triangle to the left of the folder icon, and nest layer groups within each other by dragging one folder icon into another.
Layer Shortcuts and Tasks
Rename layers by double-clicking on the layer name.
Change the transparency of a layer by changing its opacity with the Opacity slider, or typing a value into the Opacity box (which is visible when you have the Selection, Move, or Crop tools selected).
Duplicate a selected layer by pressing Ctrl-J (Command-J on a Mac). You can also duplicate a layer by dragging it while pressing the Alt (Option) key.
Select multiple layers by holding down Ctrl (Command on a Mac) and clicking the layer names. This forms a temporary link between the selected layers that allows you to move them as one unit, delete them all, and so on.
You can also link layers together. Select layers by clicking on them while holding down Shift or Ctrl (Command on a Mac). Once you have selected all the layers you wish to link, click the Link Layers button at the bottom-left of the Layers palette (signified by the chain). Linking layers allows the link relationship to remain even after you select a different layer (unlike the process of simply selecting multiple layers).
To unlink all the layers, select one of the linked layers and go to Layer > Unlink Layers. To unlink a single layer, select the layer you wish to remove from the link and click its corresponding link icon; the other layers will stay linked. To temporarily unlink a layer, hold down Shift and click on its link icon (a red “X” will appear over the link icon). Reactivate the link by holding down Shift and clicking the link icon again.
Rearrange layers by dragging the layer above or below other layers. Use the “move down” shortcut Ctrl-[ (Command-[ on a Mac) and the "move up" shortcut Ctrl-] (Command-]) to move selected layers up and down. Shift-Ctrl-[ and Shift-Ctrl-] (Shift-Command-[ and Shift-Command-] on a Mac) will bring layers to the very top or the very bottom of the stack.
Select a layer by using the keyboard shortcuts Alt-[ and Alt-] (Option-[ and Option-] on a Mac). These keystrokes let you move up and down through the layers in the Layers palette.
Create a new layer by pressing Shift-Ctrl-N (Shift-Command-N on a Mac). This will bring up the New Layer dialog box. Want to create new layers quickly without having to deal with the dialogue box? Simply press Shift-Ctrl-Alt-N (Shift-Command-Option-N).
Merge a layer into the one beneath it by pressing Ctrl-E (Command-E). If you have selected layers, this shortcut will merge those selected layers together.
Quick Keyboard Shortcuts
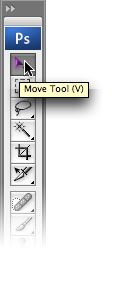
Naturally, most of the tools in the toolbox have a keyboard shortcut. You can learn each tool’s shortcut by hovering your cursor over a tool for a few seconds: a tooltip box will appear, displaying the name of the tool and its shortcut. If additional tools are available in the flyout menu, you can cycle through them by pressing Shift-[keyboard shortcut]. Keyboard shortcuts can save you valuable time — pressing “V” to bring up the Move Tool is certainly a lot quicker than moving the cursor over to the toolbox to select it. It may not seem all that significant right now, but the time you take to access tools will add up over the course of a project! For your convenience, whenever I mention a tool, I’ll list its shortcut in parentheses, e.g., the Move Tool (V).
PHOTOSHOP TOOLBOX
You’ve probably been hanging out to get stuck into the very nifty Photoshop toolbox. In this section, I’ll introduce some of the most frequently used tools found in the toolbox. I’ll discuss some of the other tools in later chapters as we apply them to solutions.

You’ll notice that some of the tool icons have small black triangles in their bottom right-hand corners. These icons contain hidden treasures! The triangle indicates that there are more related tools available; if you click on the tool icon and hold it down, a “flyout” menu will appear,displaying the additional tools.
Secret Selections
Selections can have varying levels of transparency, known as the degree of opacity. It’s actually possible to make a selection with an opacity of 100% in one area, but only 20% in another area. If a selection contains any pixels for which the opacity is more than 50%, they will be displayed with a border of dotted lines. Photoshop won’t visibly outline areas with less than 50% opacity (though they will still be selected). Selection tools automatically select at 100% opacity. We’ll learn about creating transparent selections using Quick Masks and alpha channels later in this chapter.
Selection Tools
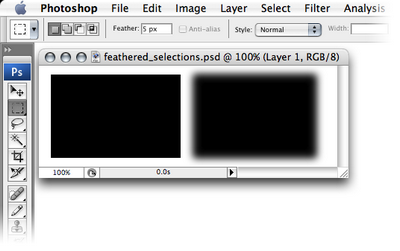
You can use the selection tools to select certain areas of your document for editing. If you use a selection tool, only the area that’s selected will be affected by any changes you make. You can “feather” selections (specify a fuzzy radius for them) using the Feather field in the options bar. The example at the top of the next page shows two rectangles: one created by filling in a selection with a feather of zero pixels, and one that’s created by filling in the same selection with a feather of five pixels.
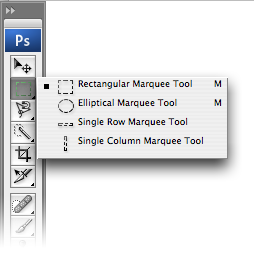
Marquee tools (M) are used to create rectangular or elliptical selections, including selections that are “single row” (one pixel tall, stretching across the entire width of the document) and “single column” (one pixel wide, stretching through the entire height of the document). To make single-row or single-column selections, click with the appropriate tool on the image area where you want to select a row or column.
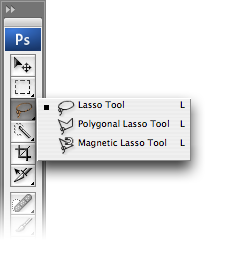
You can use the Lasso tools (L) to create freeform selections. The Lasso Tool comes in three different forms:
Lasso Tool (L) – Click and drag the Lasso Tool to draw aselection area. Releasing the mouse buttonwill close the selection by joining the start and end points with a straight line.
Polygonal Lasso Tool (L) – Click at different points to create vertices of a polygonal shape. Close the selection by moving your cursor to the beginning and clicking once, or pressing the Enter key.
No Selection Sometimes Equals All Selected
If you’ve made a selection, only the pixels within the selection are active and can be worked on. Some tools can be used without making a selection at all. However, be aware that if you have not made a specific selection, Photoshop will assume that you are working on the entire layer and any changes you make will affect all pixels in the layer.
Magnetic Lasso Tool (L) – If you think you need help with making your selection, try the Magnetic Lasso Tool. Photoshop will attempt to make a “smart” selection by following the edges of contrast and color difference. Click once near the “edge” of an object and follow around it — Photoshop will automatically lay down a path. You can also click as you follow the line to force points to be created on the path. Close the selection by pressing the Enter key or clicking at a point near the beginning of the selection.
Magic Wand
The Magic Wand Tool (W) selects areas of similar color. You can change the tolerance (how close the color values should be to the sampled color in order to be selected) of a Magic Wand selection, and choose whether you want the selection to be contiguous (pixels that are touching) or not (in which case, matching colors across the entire document will be selected).
Selection Shortcuts and Tasks
Hold the Shift key to add another selection to the first. Hold the Alt key (Option key on a Mac) to subtract your new selection from the first. Hold Shift-Alt (Shift-Option) to select the intersection of your first and second selections. Use the arrow keys to move the selection pixel by pixel. If you feel that this doesn’t move your selection quickly enough, hold down Shift and use the arrow keys to move the selection ten pixels at a time. Press Ctrl-J (Command-J on a Mac) to copy the selection into its own layer. To cut the selection into its own layer, press Shift-Ctrl-J (Shift-Command-J). If this seems familiar to you, it’s because I mentioned earlier how to copy a layer using the same keyboard shortcut. Now that you know that not selecting anything sometimes means that everything is selected, it makes sense that simply by selecting a layer in the Layers palette, you can copy the entire layer by pressing Ctrl-J (Command-J). To deselect a selected area, click outside of it with one of the Marquee tools, or press Ctrl-D (Command-D on a Mac). To reactivate your last selection, press Shift-Ctrl-D (Shift-Command-D).
The Move Tool
The Move Tool (V) moves a selected area or an entire layer. You can invoke the Move Tool temporarily when using most other tools by holding down the Ctrl key (Command key on a Mac).
Move and Copy Shortcut
For most tools, holding Ctrl-Alt (Command-Option on a Mac) and dragging a selected area will temporarily invoke the Move Tool, allowing you to move and duplicate the selected layer quickly.
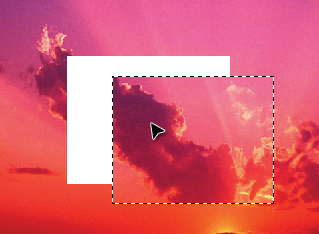
You can also duplicate a layer by holding down the Alt key (Option key on a Mac) while using the Move Tool, as shown in the image below.
The Crop Tool
The Crop Tool (C) is used to trim images. Create a selection using the Crop Tool, then double-click the center of the selection, or press Enter, to crop the image to the size of the selection.
To cancel without cropping, select another tool or press the Esc key.
Crop Outside the Box
You can use the Crop Tool to resize your canvas. Expand your document window so that it’s larger than the image area, and create a crop selection that includes the image and extends onto the gray areas “outside” the image. Applying this crop will resize your canvas to include those extended boundaries, making your canvas larger.
Drawing and Painting Tools
Apart from its extraordinary photo editing abilities, the multi-talented Photoshop also provides drawing and painting tools that allow you to create your own shapes and backgrounds.
Brush
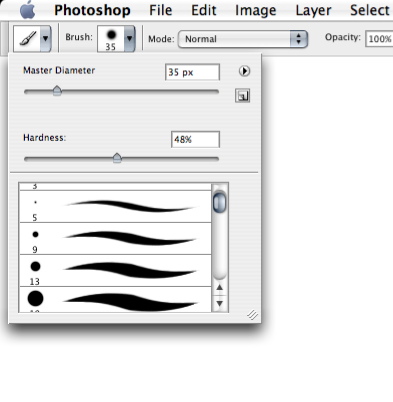
The Brush Tool (B) is suitable for soft-edged painting or drawing. Draw strokes by clicking and dragging the mouse over the canvas. You can change the brush size and other settings in the options bar at the top of the window.
Pencil
The Pencil Tool (B) is suitable for hard-edged drawing or painting and has similar options to the Brush Tool for setting its size, opacity, and more. The Pencil Tool is often used for drawing on, and editing individual pixels in, zoomed-in images.
Eraser
The Eraser Tool (E) removes pixels from the canvas. You can choose between Pencil, Brush, or Block mode from the Mode drop-down menu in the options bar.
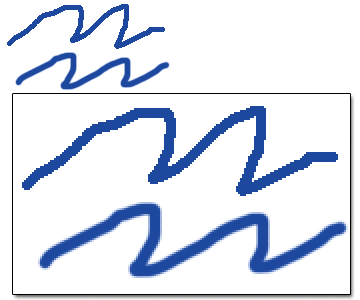
Aliased vs Anti-aliased
Unlike the Brush Tool, the Pencil Tool’s edges are aliased. The term aliased refers to the edges of an object being “jagged,” in contrast to an anti-aliased object, in which the edges are “smooth.” In the two examples shown here, the top shape in each example was created using the Pencil Tool, while the bottom shape was created using the Brush Tool. Notice the difference in the “jaggedness” of the edges of these curves. We’ll look more closely at anti-aliasing when we discuss the Text Tool.
Paint Bucket
The Paint Bucket Tool (G) fills a selection with a flat color. To use the Paint Bucket Tool, click once in the area that you wish to fill. If the chosen area is not within a selection, the Paint Bucket Tool will fill all similarly-colored pixels within the vicinity of the clicked area.
Gradient
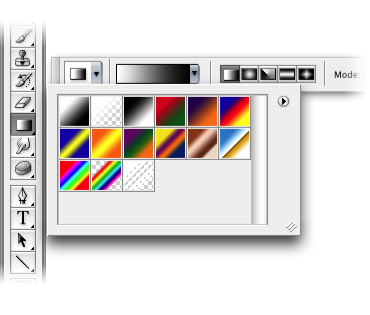
The Gradient Tool (G) fills a selection with a blend of two or more colors, known as a gradient. You can easily create your own gradient, or use any of the preset gradients available in Photoshop.
Display the gradient presets and tools by clicking on the small triangle on the right-hand side of the Gradient Tool. Apply a gradient by setting your desired colors, choosing your gradient style, then clicking and dragging the cursor over the area to be filled.
I find that I use the first two gradients — the foreground-to-background gradient, and the foreground-to-transparent gradient — most often. The former will blend your foreground color into your background color, while the latter will blend your foreground color into a transparent background, giving it a “fading out” effect.
Text Tool
The Text Tool (T), true to its name, creates text layers. This one’s easy to use — just select the Text Tool, click on the canvas, and start typing! You can also click and drag to create a rectangular text area that will force text to wrap within its boundaries. You can change the font size, color, and other text properties using the options bar along the top of the window.
When the Text Tool is active, you can move the cursor outside of the text area. The cursor will change from the “text insert” cursor to the “move” cursor, and you’ll be able to move the text layer around.
It’s worth noting that when the Text Tool is active, you can’t use keyboard shortcuts to access other tools. This may seem like an obvious thing to point out now, but it won’t always be so apparent — especially when your text mysteriously starts spurting strange characters because you’ve been trying to use the shortcut keys!
To finish using the Text Tool, press Ctrl-Enter (Command-Return on a Mac). You can then resume your regular keyboard shortcutting!
Shape Tools
You can create shapes simply by clicking and dragging Photoshop’s Rectangle, Rounded Rectangle, Ellipse, Polygon, Line, and Custom Shape tools (U).
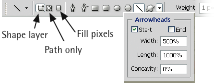
The specific options for each shape tool are displayed in the options bar, and you can access additional options by clicking on the arrow to the right of the Custom Shape button. For example, the Line Tool has options for displaying arrowheads, and for controlling the shapes and sizes of those arrowheads, as shown in the example below.
If you look at the options for each shape, you’ll notice that there are three different methods you can use to create a shape:
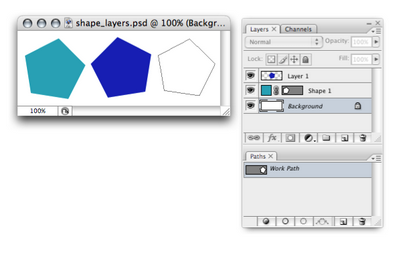
Your shape will be created as a solid-colored layer covered with a vector shape mask. Confused? Think of the mask as a sheet of dark paper that has a hole (your shape) cut out of it so that the color shines through the hole. To change the color,double-click on the color block in the Layers palette as shown in this example. To change the vector shape mask, use the vector editing tools.
as a path – Your shape will be created as a path in the Paths palette, as shown in the example above (in which the path has been named Work Path).
as filled pixels – Your shape will be created on whichever layer is currently selected. I created a new layer, then created a shape using the Fill pixels option on Layer 1 in the above example.
Selecting Colors
Set foreground and background colors by clicking on the appropriate tile and choosing a color from the Color Picker, as demonstrated in the example below.

Color Picker Shortcuts
Press X if you want to switch the foreground and background colors. Press D if you want to revert to a black foreground and white background.
Eyedropper
The Eyedropper Tool (I) lets you sample another color from your image, and set this as the foreground color. In fact, it’s actually possible to sample colors from anywhere in your display and even from other applications outside of Photoshop. Simply click inside the document window, then drag the cursor to the color you wish to sample. Click to select that color.
The Eyedropper Tool also allows you to set the background color. To do so, hold down the Alt key (Option key on a Mac) as you select colors using the eyedropper.
The Paint Brush, Pencil, Paint Bucket and any of the other painting or drawing tools can temporarily be turned into the Eyedropper Tool by holding down Alt (Option).
The Hand Tool
The Hand Tool (H) moves your canvas, which is handy (pardon the pun!) when you’re zoomed in to an image, or have a very large document open.
What’s even handier is the fact that you can invoke the Hand Tool while you’re using any other tool (except the Text Tool) by holding down the spacebar. This is a neat way to position your image exactly where you want it without having to chop and change between tools to do so.
Other Useful Tasks and Shortcuts
Zooming
Zooming right into your image is the only way to make subtle changes at the pixel level. Use Ctrl + to zoom in and Ctrl – to zoom out. You can also zoom using the slider on the Navigator palette.
Making a Selection Using the Layers Palette
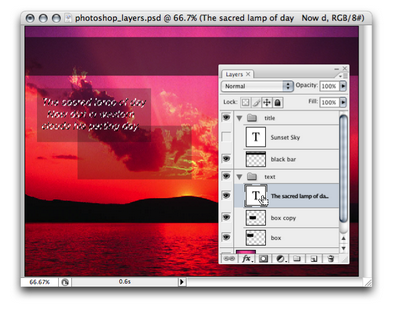
To select the pixels on a particular layer, press Ctrl (Command on a Mac) and click the thumbnail of the layer. This selection will also take into account the transparency of any pixels, so painting in the selection will recreate the transparency settings of the original layer. The example at the top of the next page shows a selection I made based on one of the text layers in my sunset document.
Making a Selection Using a Quick Mask
Quick Masks are one of those closely guarded trade secrets that professional designers use all the time, but beginners often are wary of trying because they seem complicated at first. Well, they’re not!
A Quick Mask is an alternative way of making a selection. The usual way to use a Quick Mask is to go into Quick Mask Mode (Q) and, using a tool such as the Brush Tool, painting the things you don’t want to select. This is called painting a “mask,” and the resulting reverse-selection will display as the transparent red color that you can see in the example overleaf. You can edit this red layer — honing the mask shape, for instance — using the drawing and painting tools. Those alterations won’t affect your image, though: they impact only on your final selection. Switching back to Standard Mode (Q) will complete your selection.
Why would we use this technique instead of those trusty selection tools that we’ve all come to depend on so heavily? Well, Quick Masks have a couple of advantages over the standard selection tools:
They allow you to control the level of transparency of your selection.
It’s easier to color an object in, than it is to carefully draw a line around it.
Initially, it can be difficult to get your head around the fact that you aren’t painting on your image: you’re just painting the selection. But once you master that concept, you’ll feel confident to be able to make a selection quickly on any shape, no matter how difficult it seems!
Quick Mask Options
I prefer to set Quick Mask Mode so that it lets me paint in the selected areas rather than the non-selected areas, as shown in this example. To alter your settings to do the same thing, double-click on the Quick Mask Mode icon and change the Color Indicates: option to Selected Areas.
Alpha Channels and Selections
You can use alpha channels to create selections and save them for later use. If you open the Channels palette, you’ll see several channels, displayed in a similar way to layers in the Layers palette. By default, you’ll see the color channels, which represent how much of each color is represented in the document. You can click the Create New Channel icon at the bottom of the palette to create your own alpha channel.
You can then use any of Photoshop’s painting or drawing tools to create a grayscale image that will represent your selection — white areas represent selected areas, black areas represent deselected areas, and grays represent the levels of transparency in the selection.
To turn your alpha channel masterpiece into a selection, simply hold down Ctrl and click the channel’s thumbnail (hold Command and click if you’re on a Mac).
To return to the normal image view, click on the Layers palette tab, and select any layer. Your selection will still be visible.
You can also create your own alpha channels from existing selections — a capability that can be very useful! For example, let’s say you’ve created a selection of an island silhouette like the one shown in the example below. You have a feeling that you’ll be reselecting this island pretty often, but you’d rather not recreate the selection each time. No problem! Once the selection has been made, use Select > Save Selection. Name your selection (in this example, Land), and click OK.
If you go to the Channels palette, you’ll see a new selection at the bottom of the list, named Land in the following image — that’s your saved selection. Now you can reload your Land selection as many times as you need to!
The History Palette
The History palette is your key to time travel (in Photoshop, anyway). It lists the most recent steps that you’ve made, and allows you to undo your actions by rolling your image back to a previous state. You can set the number of steps that are stored in the memory by selecting Edit > Preferences > Performance (Photoshop > Preferences > Performance on a Mac) and changing the value in the History States text box.
Like most of Photoshop’s other tools, the History palette has a set of useful keyboard shortcuts for quick access:
Ctrl-Z (Command-Z on a Mac) lets you undo and redo the previous step.
Ctrl-Alt-Z (Command-Option-Z) steps back through the History palette.
Shift-Alt-Z (Shift-Option-Z) steps forward through the History palette.
As only a limited number of history states are available, there may be cases in which you want to save a”snapshot” of your document so that you can revert back to it later if required. To do so, click on the small triangle on the top-right of the History palette and choose New Snapshot…. You can save a snapshot of the whole document, the current layer, or merged layers.
When Photoshop Stops Working
Woah! Photoshop stops working? That certainly doesn’t sound too promising! Before you panic, let me explain. Given the multitude of powerful features and fantastic tools it offers, it’s no wonder that, on occasion, Photoshop can exhaust itself. It may start behaving a bit erratically, and might even freeze, crash, or automatically exit during startup. If you find yourself in this situation, the first thing to do is reset the preferences file. The preferences file (which you can customize by going to Edit > Preferences on a PC, or Photoshop > Preferences on a Mac) holds Photoshop settings and can often become corrupted.
The location of the preferences file depends on the operating system and version of Photoshop you are using. For Photoshop CS3, the preferences file is named Adobe Photoshop CS3 Prefs.psp.The preference file for other versions of Photoshop will have a similar name.
Backing Up Your Preferences File
It’s a good idea to back up your preferences file by copying and pasting it into a location outside of the Photoshop settings folder. Then, if the preferences file Photoshop is using becomes corrupted, you can copy your backup back into the settings folder to replace the corrupted file, without losing any of your settings.
To reset the preferences file, locate the current preferences file, delete it (while Photoshop is closed), and restart Photoshop — it will recreate the preferences file using default settings. Creativepro.com provides a detailed tutorial that explains how to find and replace your preferences file, and includes preference filenames for different versions of Photoshop.
If Photoshop continues to act up, restart it while holding down the Shift-Ctrl-Alt keys (Shift-Command-Option on a Mac), and click OK when asked if you wish to delete the Photoshop settings file. Unfortunately, this will also delete your custom actions, tools, and other settings, but the good news is that it should fix your Photoshop problems.
Comps and Turtlenecks: Designer Lingo
Now that you’re going to be working in Photoshop, you might want to start talking like a designer. Designers, like professionals in most specialist fields, have their own terminology and words for things. A comp (short for “composite”) refers to a mockup of the final solution that a designer has in mind. Traditionally, “comp” is used in the print world to refer to page layouts, but for web designers it usually refers to a static interface prepared entirely in Photoshop for the client to look over before he or she decides to proceed. You might even hear it being used as a verb: “comping” is the process of creating that mockup site.
palettes – Individual “panes” that hold information or options for working with your file, known as palettes (or panels), float on the right-hand side. Each palette is labeled with a tab, and can be minimized, closed, grouped with other palettes, or dragged in and out of a panel dock. In the example that follows, the Navigator palette contains a thumbnail of the image that allows you to zoom in or out of the image quickly, and to change the part of the image displayed on the screen.
document windows – Each open document has its own document window with a status bar along the bottom. The status bar sits to the right of the zoom percentage displayed in the bottom left-hand corner, and displays information that’s specific to the document.
Customizing your Workspace
You can customize your Photoshop workspace to suit you or your project — almost everything within your workspace can be repositioned and reconfigured! You might choose to customize your workspace by:
changing the look of the menu bar
You can change which menu items are visible in your menu bar, and even add color to your menu items. If you wanted, you could also assign new or different keyboard shortcuts to menu commands (which I don’t recommend until you feel very comfortable with Photoshop or have a compelling reason to do so!). Go to Edit > Menus and use the dialog box to modify the menu bar and palette menus.
moving the options bar
If you want to move the options bar, you can do so by clicking on the handle on its left side and moving it around. The options bar will “dock” to the top or bottom of the screen automatically if moved near those areas.
moving the toolbox
The toolbox is extremely portable, and can be moved to any location on your screen. Move the toolbox by clicking on the light gray area at the top of it and dragging it around. You can switch between different toolbox layouts by clicking the double arrow along the top of the toolbox.
rearranging palettes
There are many ways to rearrange your palettes. You might want to separate a palette from its palette group, and move it into another group. You can do this by dragging the palette tab out of its original group and into the new group. You may want to expand or collapse a dock, by clicking on the double arrows at the top of the dock. You might also decide to drag some of your palette tabs out of their dock, and close the rest. To display a palette that has been closed, go to Window and select the palette you want to show.
displaying different information in the document window status bar
The status bar displays the document file size by default. The file size is shown as two numbers separated by a forward slash: the first number is an approximation of the image file size with all layers merged (known as “flattening” the image), and the second number is an approximation of the total file size of the image with layers intact. If all this sounds new to you, don’t worry — we’ll be discussing layers shortly. You can set the status bar to display different information, such as the document dimension in pixels, or the version number of the file. To do this, click on the arrow icon next to the status bar, select Show and choose the information you’d like to see.
Saving your Customized Workspace
As you become more proficient with Photoshop, you may discover that you use certain sets of palettes for different types of projects, and that there are some palettes that you don’t use at all. Photoshop allows you to save and load different workspaces — different arrangements of palettes, menus, and even different keyboard shortcuts — to help you work more efficiently.
After you’ve customized your workspace to your satisfaction, select the Workspace menu in the options bar, click Save Workspace and enter a name for your workspace, such as Creating Thumbnails or My Default Workspace. You can then load your different workspaces by opening Workspace and selecting your custom workspace from the menu list.
WORKING IN PHOTOSHOP
Now that you’ve been introduced to the Photoshop workspace and have a basic idea of where everything is, let’s start getting our hands dirty.
Creating New Documents
You can create a new document by selecting File > New from the menu bar, or pressing the keyboard shortcut Ctrl-N on a PC or Command-N on a Mac. The New dialog box will appear,where you can specify the document size and other settings.
Opening Files
Open files by selecting File > Open from the menu bar, or pressing Ctrl-O (Command-O on a Mac). You can select and open multiple files by holding down Ctrl (Command on a Mac) and clicking on all the files you require in the file dialog box.
Saving Files
Save a file by selecting File > Save, or pressing Ctrl-S (Command-S on a Mac). For a newly-created document, this will save your work in Photoshop Document (PSD) format. If you would prefer to save a copy of the document, you can use File > Save As or pressing Ctrl-Shift-S (Command-Shift-S on a Mac) instead.
Snappy Presets
If you’re designing for a web site with a minimum screen size of 800×600 pixels, I’d recommend you start with a 750×550 pixel document. The smaller dimensions give you a better estimate of your actual screen area after you take into account scroll bars and menu bars. Also, be sure to set the resolution at 72dpi to reflect the actual screen resolution. If you want easy access to these dimensions for other new documents, it’s probably a good idea to click Save Preset and give the settings a name like Web Page. The next time you create a new document, you will be able to load your Web Page settings from the Preset list.
Saving Files for the Web
Photoshop files themselves can’t be embedded into a web page. You will need to export your file and save it in a web-friendly format. There are three formats for web graphics: GIFs, JPEGs, and PNGs.
GIF
The GIF format (pronounced “jiff” or “giff” depending on which side of the tracks you grew up) can have a maximum of 256 colors. GIF files support transparency and animation, and work best with graphics that have large areas of the same color, as shown in the logo below.
JPEG
The JPEG format (pronounced “jay-peg”), works best with photographic images or images that have more than 256 colors and gradients, such as the flower on the opposite page. Images saved in JPEG format are compressed, which means that image information will actually be lost, causing the image to degrade in quality.
PNG
The PNG format (pronounced “ping”) is similar to the GIF format in that it supports transparency and works best with solid-color images like the logo shown to the right, but it’s superior to the GIF format as it has the ability to support true levels of transparency for colored areas. Transparent PNGs are currently not in widespread use on the Web because older versions of Microsoft Internet Explorer do not support them; however, they’re often used in Macromedia Flash movies. PNGs can produce a better quality image at a smaller file size than can GIFs. Photoshop allows you to save an image as a PNG-8 file (which works the same way as a GIF would with 256 colors) or a PNG-24 file (which allows for millions of colors as well as variable transparency).
Double-clicking Power
As if keyboard shortcuts weren’t quick enough, Windows users have even more ways to open and save files, such as: holding down Ctrl and double-clicking the work area to create new documents double-clicking the work area to pull up the Open dialog box to open files holding down Alt and double-clicking the work area to open existing files as new documents holding down Ctrl-Shift and double-clicking the work area to save documents holding down Shift and double-clicking the work area to access Adobe Bridge — Adobe’s “control center” and file browser The work area is the gray area behind the document windows. If your shortcuts aren’t working, check that you are clicking on an empty spot on the work area, and not in one of the document windows or Photoshop tools! Alas, Photoshop on a Mac does not have a work area, so Mac users won’t get to enjoy the goodness of double-click shortcuts.
To save for the Web in Photoshop, select File > Save for Web & Devices… or press Ctrl-Alt-Shift-S(Command-Option-Shift-S on a Mac). This will bring up the Save For Web dialog box shown overleaf, which will show you a preview of the image that will be exported, with its optimized size in the bottom left-hand corner. You can adjust the settings for the image using the options in the pane on the right. Choose whether you want to save the file as a GIF,JPEG, PNG-8, or PNG-24, and have a play with the other settings, keeping an eye on the optimized file size. Try to strike a balance between the quality and file size of the image. When you’re happy with your result, click Save and give your image a filename.
If you tried the above exercise, you’re probably quite pleased with yourself for saving an image of reasonable quality at a file size significantly smaller than the original. You managed this by altering the settings in the right-hand pane, but what do these settings actually do?
GIF/PNG-8
colors – Adjusting this setting reduces the number of colors used in the image. This will usually make the biggest difference in the final image.
dither amount and type (No Dither, Diffusion, Pattern, Noise) – This setting has nothing to do with being nervous or agitated (although it’s quite possible that you may have been a few moments ago!). Dither refers to a compression technique in which the pattern of dots is varied to give the illusion of a color gradient. Changing the dither will result in a more noticeable degradation for images that involve a large number of colors blended together.
transparency – If you want transparent areas in your graphic, check this box. We’ll look more closely at transparency in Chapter 2.
matte color – For transparent images, the matte color is used to help blend the edges of your image into the background of the web page. For non-transparent images, the matte color defines the background color of the image. Using matte color with transparent images is covered in more detail in Chapter 2.
JPEG
quality – Changing the value in the Quality drop-down box alters the level of compression for the image. Reducing the quality may result in blurring or pixelation, but too high a setting will produce a large file that will take users too long to download. A good approach is to decrease the quality value gradually until you notice the degradation of your image becoming unacceptable. A reasonable compromise will be somewhere around this point.
Saving Files for the Web in Fireworks
You can optimize images for the Web in Fireworks using the Optimize palette, shown at right. Set the file type and options in the Optimize palette in advance, and when you’re ready to export your web image, select File > Export or press Ctrl-Shift-R (Command-Shift-R on a Mac). Fireworks will save the image based on the settings that you’ve defined.
Why Two Tools?
Considering that it’s possible to save files for the Web in Photoshop, it’s perfectly reasonable for you to wonder why you would need Fireworks. While it’s true that both programs can perform many of the same tasks, there are certain things that Fireworks can do that Photoshop can’t. Fireworks also makes web-specific tasks easier, and since it’s a smaller program that doesn’t contain the full suite of Photoshop effects, it loads more quickly than Photoshop. As you work through this book you’ll come to learn which tool is more suitable for particular tasks.
PHOTOSHOP LAYERS
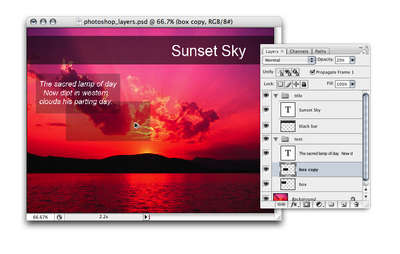
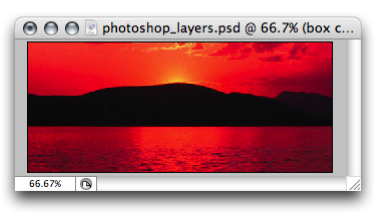
Layers are a powerful feature of Photoshop that allow you to work on one part of an image without disturbing the rest of it. While the concept of layers may seem intimidating at first, once you get the hang of using layers you’ll wonder how you ever survived without them! The examples on the next page show how the layers in the Photoshop document to the right stack together.
The transparent parts of any layer, shown by the checkered grid, allow the layers beneath that layer to show through.
You can show and hide each layer in an image by clicking on its corresponding eye icon in the Layers palette, as shown at the bottom of the following page.
To organize your layers, you can arrange them into layer groups by going to Layer > New > Group…. Each layer group displays in the same way as any ungrouped layers on the Layers palette. A layer group is signified by a folder icon. You can collapse or expand layer groups by clicking on the triangle to the left of the folder icon, and nest layer groups within each other by dragging one folder icon into another.
Layer Shortcuts and Tasks
Rename layers by double-clicking on the layer name.
Change the transparency of a layer by changing its opacity with the Opacity slider, or typing a value into the Opacity box (which is visible when you have the Selection, Move, or Crop tools selected).
Duplicate a selected layer by pressing Ctrl-J (Command-J on a Mac). You can also duplicate a layer by dragging it while pressing the Alt (Option) key.
Select multiple layers by holding down Ctrl (Command on a Mac) and clicking the layer names. This forms a temporary link between the selected layers that allows you to move them as one unit, delete them all, and so on.
You can also link layers together. Select layers by clicking on them while holding down Shift or Ctrl (Command on a Mac). Once you have selected all the layers you wish to link, click the Link Layers button at the bottom-left of the Layers palette (signified by the chain). Linking layers allows the link relationship to remain even after you select a different layer (unlike the process of simply selecting multiple layers).
To unlink all the layers, select one of the linked layers and go to Layer > Unlink Layers. To unlink a single layer, select the layer you wish to remove from the link and click its corresponding link icon; the other layers will stay linked. To temporarily unlink a layer, hold down Shift and click on its link icon (a red “X” will appear over the link icon). Reactivate the link by holding down Shift and clicking the link icon again.
Rearrange layers by dragging the layer above or below other layers. Use the “move down” shortcut Ctrl-[ (Command-[ on a Mac) and the "move up" shortcut Ctrl-] (Command-]) to move selected layers up and down. Shift-Ctrl-[ and Shift-Ctrl-] (Shift-Command-[ and Shift-Command-] on a Mac) will bring layers to the very top or the very bottom of the stack.
Select a layer by using the keyboard shortcuts Alt-[ and Alt-] (Option-[ and Option-] on a Mac). These keystrokes let you move up and down through the layers in the Layers palette.
Create a new layer by pressing Shift-Ctrl-N (Shift-Command-N on a Mac). This will bring up the New Layer dialog box. Want to create new layers quickly without having to deal with the dialogue box? Simply press Shift-Ctrl-Alt-N (Shift-Command-Option-N).
Merge a layer into the one beneath it by pressing Ctrl-E (Command-E). If you have selected layers, this shortcut will merge those selected layers together.
Quick Keyboard Shortcuts
Naturally, most of the tools in the toolbox have a keyboard shortcut. You can learn each tool’s shortcut by hovering your cursor over a tool for a few seconds: a tooltip box will appear, displaying the name of the tool and its shortcut. If additional tools are available in the flyout menu, you can cycle through them by pressing Shift-[keyboard shortcut]. Keyboard shortcuts can save you valuable time — pressing “V” to bring up the Move Tool is certainly a lot quicker than moving the cursor over to the toolbox to select it. It may not seem all that significant right now, but the time you take to access tools will add up over the course of a project! For your convenience, whenever I mention a tool, I’ll list its shortcut in parentheses, e.g., the Move Tool (V).
PHOTOSHOP TOOLBOX
You’ve probably been hanging out to get stuck into the very nifty Photoshop toolbox. In this section, I’ll introduce some of the most frequently used tools found in the toolbox. I’ll discuss some of the other tools in later chapters as we apply them to solutions.
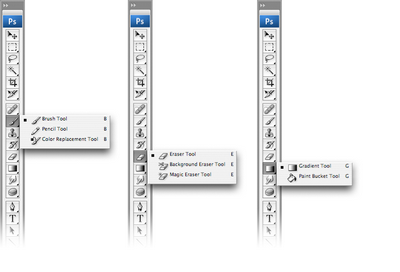
You’ll notice that some of the tool icons have small black triangles in their bottom right-hand corners. These icons contain hidden treasures! The triangle indicates that there are more related tools available; if you click on the tool icon and hold it down, a “flyout” menu will appear,displaying the additional tools.
Secret Selections
Selections can have varying levels of transparency, known as the degree of opacity. It’s actually possible to make a selection with an opacity of 100% in one area, but only 20% in another area. If a selection contains any pixels for which the opacity is more than 50%, they will be displayed with a border of dotted lines. Photoshop won’t visibly outline areas with less than 50% opacity (though they will still be selected). Selection tools automatically select at 100% opacity. We’ll learn about creating transparent selections using Quick Masks and alpha channels later in this chapter.
Selection Tools
You can use the selection tools to select certain areas of your document for editing. If you use a selection tool, only the area that’s selected will be affected by any changes you make. You can “feather” selections (specify a fuzzy radius for them) using the Feather field in the options bar. The example at the top of the next page shows two rectangles: one created by filling in a selection with a feather of zero pixels, and one that’s created by filling in the same selection with a feather of five pixels.
Marquee tools (M) are used to create rectangular or elliptical selections, including selections that are “single row” (one pixel tall, stretching across the entire width of the document) and “single column” (one pixel wide, stretching through the entire height of the document). To make single-row or single-column selections, click with the appropriate tool on the image area where you want to select a row or column.
You can use the Lasso tools (L) to create freeform selections. The Lasso Tool comes in three different forms:
Lasso Tool (L) – Click and drag the Lasso Tool to draw aselection area. Releasing the mouse buttonwill close the selection by joining the start and end points with a straight line.
Polygonal Lasso Tool (L) – Click at different points to create vertices of a polygonal shape. Close the selection by moving your cursor to the beginning and clicking once, or pressing the Enter key.
No Selection Sometimes Equals All Selected
If you’ve made a selection, only the pixels within the selection are active and can be worked on. Some tools can be used without making a selection at all. However, be aware that if you have not made a specific selection, Photoshop will assume that you are working on the entire layer and any changes you make will affect all pixels in the layer.
Magnetic Lasso Tool (L) – If you think you need help with making your selection, try the Magnetic Lasso Tool. Photoshop will attempt to make a “smart” selection by following the edges of contrast and color difference. Click once near the “edge” of an object and follow around it — Photoshop will automatically lay down a path. You can also click as you follow the line to force points to be created on the path. Close the selection by pressing the Enter key or clicking at a point near the beginning of the selection.
Magic Wand
The Magic Wand Tool (W) selects areas of similar color. You can change the tolerance (how close the color values should be to the sampled color in order to be selected) of a Magic Wand selection, and choose whether you want the selection to be contiguous (pixels that are touching) or not (in which case, matching colors across the entire document will be selected).
Selection Shortcuts and Tasks
Hold the Shift key to add another selection to the first. Hold the Alt key (Option key on a Mac) to subtract your new selection from the first. Hold Shift-Alt (Shift-Option) to select the intersection of your first and second selections. Use the arrow keys to move the selection pixel by pixel. If you feel that this doesn’t move your selection quickly enough, hold down Shift and use the arrow keys to move the selection ten pixels at a time. Press Ctrl-J (Command-J on a Mac) to copy the selection into its own layer. To cut the selection into its own layer, press Shift-Ctrl-J (Shift-Command-J). If this seems familiar to you, it’s because I mentioned earlier how to copy a layer using the same keyboard shortcut. Now that you know that not selecting anything sometimes means that everything is selected, it makes sense that simply by selecting a layer in the Layers palette, you can copy the entire layer by pressing Ctrl-J (Command-J). To deselect a selected area, click outside of it with one of the Marquee tools, or press Ctrl-D (Command-D on a Mac). To reactivate your last selection, press Shift-Ctrl-D (Shift-Command-D).
The Move Tool
The Move Tool (V) moves a selected area or an entire layer. You can invoke the Move Tool temporarily when using most other tools by holding down the Ctrl key (Command key on a Mac).
Move and Copy Shortcut
For most tools, holding Ctrl-Alt (Command-Option on a Mac) and dragging a selected area will temporarily invoke the Move Tool, allowing you to move and duplicate the selected layer quickly.
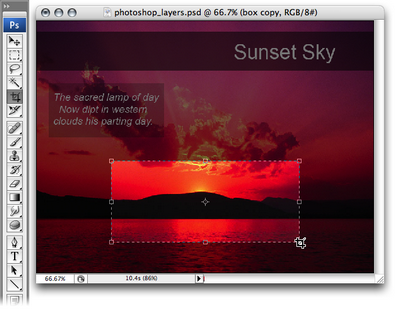
You can also duplicate a layer by holding down the Alt key (Option key on a Mac) while using the Move Tool, as shown in the image below.
The Crop Tool
The Crop Tool (C) is used to trim images. Create a selection using the Crop Tool, then double-click the center of the selection, or press Enter, to crop the image to the size of the selection.
To cancel without cropping, select another tool or press the Esc key.
Crop Outside the Box
You can use the Crop Tool to resize your canvas. Expand your document window so that it’s larger than the image area, and create a crop selection that includes the image and extends onto the gray areas “outside” the image. Applying this crop will resize your canvas to include those extended boundaries, making your canvas larger.
Drawing and Painting Tools
Apart from its extraordinary photo editing abilities, the multi-talented Photoshop also provides drawing and painting tools that allow you to create your own shapes and backgrounds.
Brush
The Brush Tool (B) is suitable for soft-edged painting or drawing. Draw strokes by clicking and dragging the mouse over the canvas. You can change the brush size and other settings in the options bar at the top of the window.
Pencil
The Pencil Tool (B) is suitable for hard-edged drawing or painting and has similar options to the Brush Tool for setting its size, opacity, and more. The Pencil Tool is often used for drawing on, and editing individual pixels in, zoomed-in images.
Eraser
The Eraser Tool (E) removes pixels from the canvas. You can choose between Pencil, Brush, or Block mode from the Mode drop-down menu in the options bar.
Aliased vs Anti-aliased
Unlike the Brush Tool, the Pencil Tool’s edges are aliased. The term aliased refers to the edges of an object being “jagged,” in contrast to an anti-aliased object, in which the edges are “smooth.” In the two examples shown here, the top shape in each example was created using the Pencil Tool, while the bottom shape was created using the Brush Tool. Notice the difference in the “jaggedness” of the edges of these curves. We’ll look more closely at anti-aliasing when we discuss the Text Tool.
Paint Bucket
The Paint Bucket Tool (G) fills a selection with a flat color. To use the Paint Bucket Tool, click once in the area that you wish to fill. If the chosen area is not within a selection, the Paint Bucket Tool will fill all similarly-colored pixels within the vicinity of the clicked area.
Gradient
The Gradient Tool (G) fills a selection with a blend of two or more colors, known as a gradient. You can easily create your own gradient, or use any of the preset gradients available in Photoshop.
Display the gradient presets and tools by clicking on the small triangle on the right-hand side of the Gradient Tool. Apply a gradient by setting your desired colors, choosing your gradient style, then clicking and dragging the cursor over the area to be filled.
I find that I use the first two gradients — the foreground-to-background gradient, and the foreground-to-transparent gradient — most often. The former will blend your foreground color into your background color, while the latter will blend your foreground color into a transparent background, giving it a “fading out” effect.
Text Tool
The Text Tool (T), true to its name, creates text layers. This one’s easy to use — just select the Text Tool, click on the canvas, and start typing! You can also click and drag to create a rectangular text area that will force text to wrap within its boundaries. You can change the font size, color, and other text properties using the options bar along the top of the window.
When the Text Tool is active, you can move the cursor outside of the text area. The cursor will change from the “text insert” cursor to the “move” cursor, and you’ll be able to move the text layer around.
It’s worth noting that when the Text Tool is active, you can’t use keyboard shortcuts to access other tools. This may seem like an obvious thing to point out now, but it won’t always be so apparent — especially when your text mysteriously starts spurting strange characters because you’ve been trying to use the shortcut keys!
To finish using the Text Tool, press Ctrl-Enter (Command-Return on a Mac). You can then resume your regular keyboard shortcutting!
Shape Tools
You can create shapes simply by clicking and dragging Photoshop’s Rectangle, Rounded Rectangle, Ellipse, Polygon, Line, and Custom Shape tools (U).
The specific options for each shape tool are displayed in the options bar, and you can access additional options by clicking on the arrow to the right of the Custom Shape button. For example, the Line Tool has options for displaying arrowheads, and for controlling the shapes and sizes of those arrowheads, as shown in the example below.
If you look at the options for each shape, you’ll notice that there are three different methods you can use to create a shape:
Your shape will be created as a solid-colored layer covered with a vector shape mask. Confused? Think of the mask as a sheet of dark paper that has a hole (your shape) cut out of it so that the color shines through the hole. To change the color,double-click on the color block in the Layers palette as shown in this example. To change the vector shape mask, use the vector editing tools.
as a path – Your shape will be created as a path in the Paths palette, as shown in the example above (in which the path has been named Work Path).
as filled pixels – Your shape will be created on whichever layer is currently selected. I created a new layer, then created a shape using the Fill pixels option on Layer 1 in the above example.
Selecting Colors
Set foreground and background colors by clicking on the appropriate tile and choosing a color from the Color Picker, as demonstrated in the example below.
Color Picker Shortcuts
Press X if you want to switch the foreground and background colors. Press D if you want to revert to a black foreground and white background.
Eyedropper
The Eyedropper Tool (I) lets you sample another color from your image, and set this as the foreground color. In fact, it’s actually possible to sample colors from anywhere in your display and even from other applications outside of Photoshop. Simply click inside the document window, then drag the cursor to the color you wish to sample. Click to select that color.
The Eyedropper Tool also allows you to set the background color. To do so, hold down the Alt key (Option key on a Mac) as you select colors using the eyedropper.
The Paint Brush, Pencil, Paint Bucket and any of the other painting or drawing tools can temporarily be turned into the Eyedropper Tool by holding down Alt (Option).
The Hand Tool
The Hand Tool (H) moves your canvas, which is handy (pardon the pun!) when you’re zoomed in to an image, or have a very large document open.
What’s even handier is the fact that you can invoke the Hand Tool while you’re using any other tool (except the Text Tool) by holding down the spacebar. This is a neat way to position your image exactly where you want it without having to chop and change between tools to do so.
Other Useful Tasks and Shortcuts
Zooming
Zooming right into your image is the only way to make subtle changes at the pixel level. Use Ctrl + to zoom in and Ctrl – to zoom out. You can also zoom using the slider on the Navigator palette.
Making a Selection Using the Layers Palette
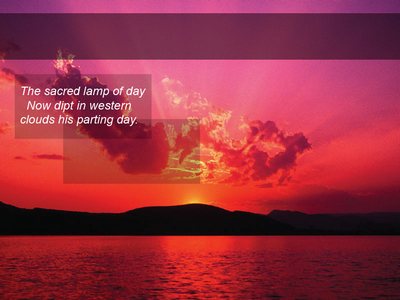
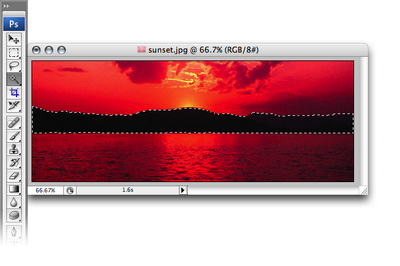
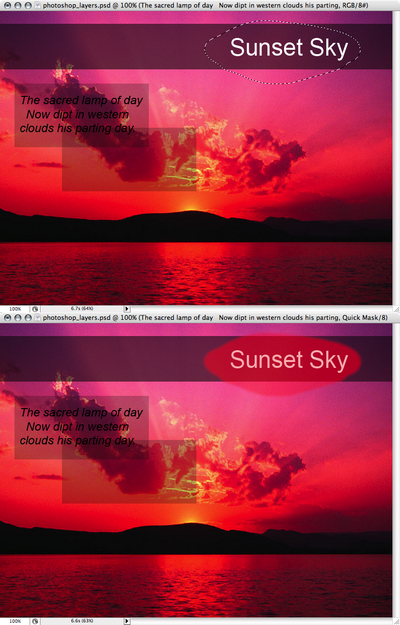
To select the pixels on a particular layer, press Ctrl (Command on a Mac) and click the thumbnail of the layer. This selection will also take into account the transparency of any pixels, so painting in the selection will recreate the transparency settings of the original layer. The example at the top of the next page shows a selection I made based on one of the text layers in my sunset document.
Making a Selection Using a Quick Mask
Quick Masks are one of those closely guarded trade secrets that professional designers use all the time, but beginners often are wary of trying because they seem complicated at first. Well, they’re not!
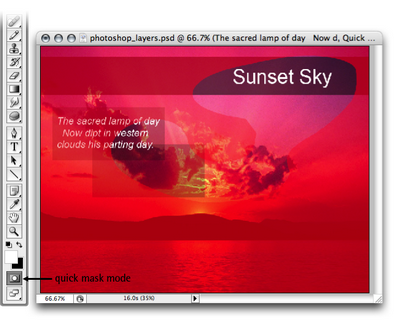
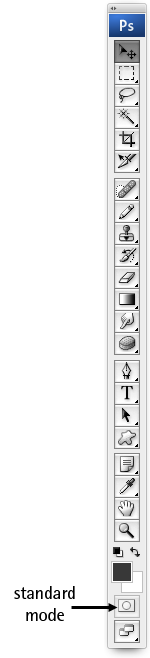
A Quick Mask is an alternative way of making a selection. The usual way to use a Quick Mask is to go into Quick Mask Mode (Q) and, using a tool such as the Brush Tool, painting the things you don’t want to select. This is called painting a “mask,” and the resulting reverse-selection will display as the transparent red color that you can see in the example overleaf. You can edit this red layer — honing the mask shape, for instance — using the drawing and painting tools. Those alterations won’t affect your image, though: they impact only on your final selection. Switching back to Standard Mode (Q) will complete your selection.
Why would we use this technique instead of those trusty selection tools that we’ve all come to depend on so heavily? Well, Quick Masks have a couple of advantages over the standard selection tools:
They allow you to control the level of transparency of your selection.
It’s easier to color an object in, than it is to carefully draw a line around it.
Initially, it can be difficult to get your head around the fact that you aren’t painting on your image: you’re just painting the selection. But once you master that concept, you’ll feel confident to be able to make a selection quickly on any shape, no matter how difficult it seems!
Quick Mask Options
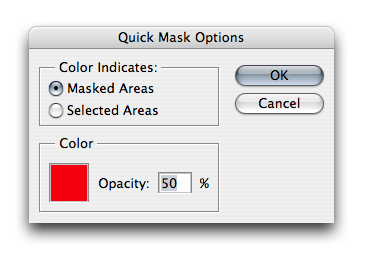
I prefer to set Quick Mask Mode so that it lets me paint in the selected areas rather than the non-selected areas, as shown in this example. To alter your settings to do the same thing, double-click on the Quick Mask Mode icon and change the Color Indicates: option to Selected Areas.
Alpha Channels and Selections
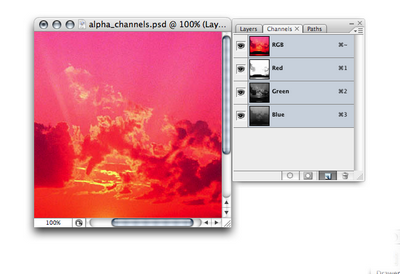
You can use alpha channels to create selections and save them for later use. If you open the Channels palette, you’ll see several channels, displayed in a similar way to layers in the Layers palette. By default, you’ll see the color channels, which represent how much of each color is represented in the document. You can click the Create New Channel icon at the bottom of the palette to create your own alpha channel.
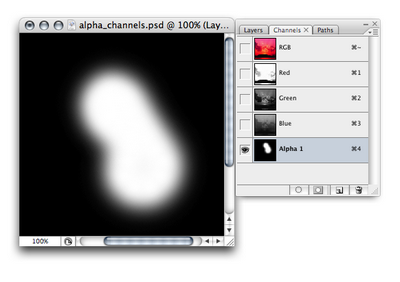
You can then use any of Photoshop’s painting or drawing tools to create a grayscale image that will represent your selection — white areas represent selected areas, black areas represent deselected areas, and grays represent the levels of transparency in the selection.
To turn your alpha channel masterpiece into a selection, simply hold down Ctrl and click the channel’s thumbnail (hold Command and click if you’re on a Mac).
To return to the normal image view, click on the Layers palette tab, and select any layer. Your selection will still be visible.
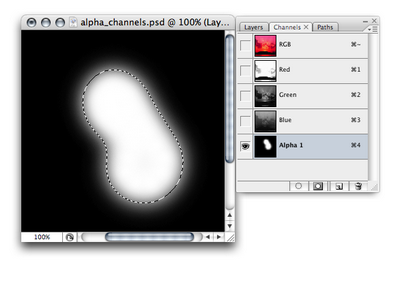
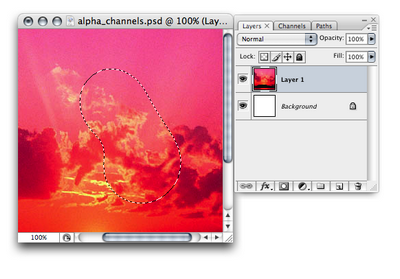
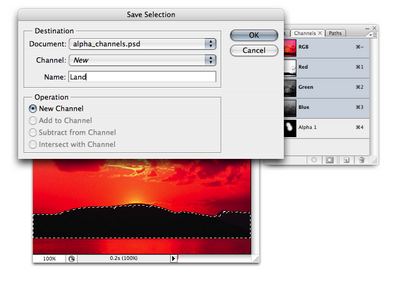
You can also create your own alpha channels from existing selections — a capability that can be very useful! For example, let’s say you’ve created a selection of an island silhouette like the one shown in the example below. You have a feeling that you’ll be reselecting this island pretty often, but you’d rather not recreate the selection each time. No problem! Once the selection has been made, use Select > Save Selection. Name your selection (in this example, Land), and click OK.
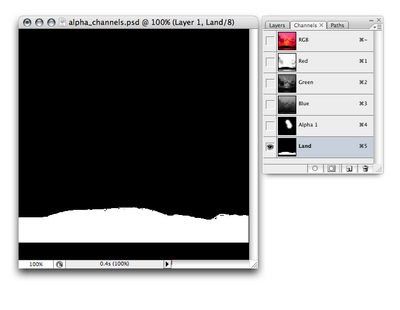
If you go to the Channels palette, you’ll see a new selection at the bottom of the list, named Land in the following image — that’s your saved selection. Now you can reload your Land selection as many times as you need to!
The History Palette
The History palette is your key to time travel (in Photoshop, anyway). It lists the most recent steps that you’ve made, and allows you to undo your actions by rolling your image back to a previous state. You can set the number of steps that are stored in the memory by selecting Edit > Preferences > Performance (Photoshop > Preferences > Performance on a Mac) and changing the value in the History States text box.
Like most of Photoshop’s other tools, the History palette has a set of useful keyboard shortcuts for quick access:
Ctrl-Z (Command-Z on a Mac) lets you undo and redo the previous step.
Ctrl-Alt-Z (Command-Option-Z) steps back through the History palette.
Shift-Alt-Z (Shift-Option-Z) steps forward through the History palette.
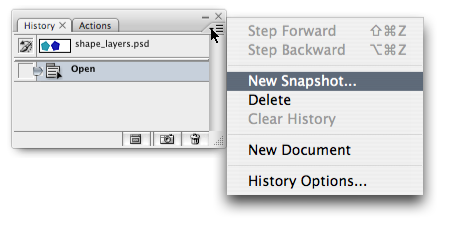
As only a limited number of history states are available, there may be cases in which you want to save a”snapshot” of your document so that you can revert back to it later if required. To do so, click on the small triangle on the top-right of the History palette and choose New Snapshot…. You can save a snapshot of the whole document, the current layer, or merged layers.
When Photoshop Stops Working
Woah! Photoshop stops working? That certainly doesn’t sound too promising! Before you panic, let me explain. Given the multitude of powerful features and fantastic tools it offers, it’s no wonder that, on occasion, Photoshop can exhaust itself. It may start behaving a bit erratically, and might even freeze, crash, or automatically exit during startup. If you find yourself in this situation, the first thing to do is reset the preferences file. The preferences file (which you can customize by going to Edit > Preferences on a PC, or Photoshop > Preferences on a Mac) holds Photoshop settings and can often become corrupted.
The location of the preferences file depends on the operating system and version of Photoshop you are using. For Photoshop CS3, the preferences file is named Adobe Photoshop CS3 Prefs.psp.The preference file for other versions of Photoshop will have a similar name.
Backing Up Your Preferences File
It’s a good idea to back up your preferences file by copying and pasting it into a location outside of the Photoshop settings folder. Then, if the preferences file Photoshop is using becomes corrupted, you can copy your backup back into the settings folder to replace the corrupted file, without losing any of your settings.
To reset the preferences file, locate the current preferences file, delete it (while Photoshop is closed), and restart Photoshop — it will recreate the preferences file using default settings. Creativepro.com provides a detailed tutorial that explains how to find and replace your preferences file, and includes preference filenames for different versions of Photoshop.
If Photoshop continues to act up, restart it while holding down the Shift-Ctrl-Alt keys (Shift-Command-Option on a Mac), and click OK when asked if you wish to delete the Photoshop settings file. Unfortunately, this will also delete your custom actions, tools, and other settings, but the good news is that it should fix your Photoshop problems.
SUMMARY
This chapter provided an overview of the Photoshop and Fireworks interfaces and common tools, and also explained a few basic tasks such as creating new documents and saving files for the Web. You also took a quick tour of handy keyboard shortcuts and other time-saving tips. Even if you haven’t used Photoshop before, you now have the tools that you’ll need to work with the examples we’ll discuss throughout the rest of this book.
This chapter provided an overview of the Photoshop and Fireworks interfaces and common tools, and also explained a few basic tasks such as creating new documents and saving files for the Web. You also took a quick tour of handy keyboard shortcuts and other time-saving tips. Even if you haven’t used Photoshop before, you now have the tools that you’ll need to work with the examples we’ll discuss throughout the rest of this book.
No comments:
Post a Comment